How to Make Perfect Steamed Bao Buns
There’s something almost magical about biting into a freshly steamed bao bun – that cloud-like softness, the gentle give between your teeth, the way it cradles whatever filling you’ve tucked inside. I’ll be honest, the first time I attempted homemade bao buns, they came out dense as hockey pucks. But after some trial and error (and a late-night text to my friend’s Taiwanese grandmother), I finally cracked the code to creating those pillowy-soft buns that rival anything you’d find at your favorite Asian street food bao stall.
Making steamed bao buns from scratch might seem intimidating, but here’s the truth: once you understand the dough and get the steaming technique down, you’ll wonder why you ever thought twice about it. These versatile little pockets are perfect blank canvases for everything from traditional braised chicken to creative gua bao fusion filling combinations that’ll make your taste buds do a happy dance.
Table of Contents
After the step-by-step recipe, dive into a treasure trove of tips, tricks, and creative variations to elevate your bao game.
Recipe Overview
| Prep Time: | Cook Time: | Total Time: | Servings: |
|---|---|---|---|
| 2 hours 30 mins | 12 mins | 2 hours 42 mins | 12-14 buns |
| (including rise time) |
Ingredients
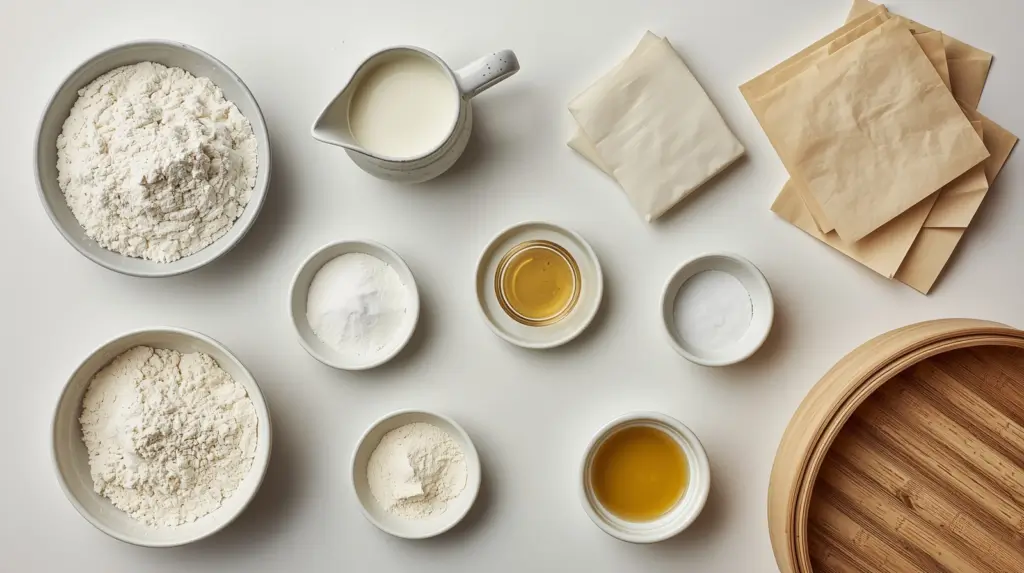
For the Bao Dough:
- 3 cups all-purpose flour, plus extra for dusting
- 1/4 cup cake flour or cornstarch (for extra softness)
- 1 cup warm whole milk (110°F/43°C)
- 1/4 cup warm water
- 3 tablespoons granulated sugar
- 2 1/4 teaspoons active dry yeast (1 packet)
- 2 tablespoons vegetable oil, plus more for brushing
- 1 1/2 teaspoons baking powder
- 1/2 teaspoon salt
- 1/4 teaspoon white vinegar (secret ingredient for extra fluffiness!)
For Steaming Setup:
- Parchment paper squares (3×3 inches), 12-14 pieces
- Neutral oil for brushing
- Large bamboo steamer or metal steaming basket
Recipe Variations & Adaptations
- Whole Wheat Version: Substitute up to half the all-purpose flour with whole wheat for a nuttier flavor.
- Dairy-Free Option: Replace milk with unsweetened soy milk or oat milk – works beautifully.
- Sweet Bao Twist: Increase sugar to 1/3 cup and add vanilla extract for dessert buns.
- Colored Buns: Mix in matcha powder, beetroot powder, or activated charcoal for colorful variations.
- Mini Bao Version: Divide dough into 24 pieces for bite-sized party appetizers.
- Make-Ahead Dough: Refrigerate after first rise for up to 24 hours for better flavor.
Timing & Temperature Guide
Planning Your Bao-Making Session
Here’s something nobody tells you when you’re learning how to make a bao bun: timing matters more than you think. You can’t rush yeast, and you definitely can’t rush the dough if you want those signature fluffy clouds. I typically start my bao dough right after breakfast if I’m planning to serve them for dinner.
Temperature Sweet Spots for Perfect Rise
Yeast is fussy, I won’t lie. Too hot and you’ll kill it, too cold and it’ll just sit there doing nothing. The milk should feel warm like a comfortable bath – if you can hold your finger in it without flinching, you’re good. I once made bao in my drafty kitchen in January and it took twice as long. Now I let the dough rise in my turned-off oven with just the light on.
Preparation Timeline Table
| Phase | Temperature | Duration |
|---|---|---|
| Activate Yeast | 110°F (43°C) | 5-8 minutes |
| Dough Kneading | Room temp | 8-10 minutes |
| First Rise | 75-80°F (24-27°C) | 1-1.5 hours |
| Shaping & Folding | Room temp | 15 minutes |
| Second Rise | 75-80°F (24-27°C) | 30-45 minutes |
| Water Boiling | Rolling boil | 5 minutes |
| Steaming Time | Medium-high heat | 12-15 minutes |
| Resting After Steam | Room temp | 2 minutes |
Step-by-Step Instructions: From Flour to Fluffy Perfection

Creating the Perfect Bao Dough
Yeast Activation:
- Pour warm milk and water into a large mixing bowl
- Sprinkle sugar over the liquid and stir until dissolved
- Add active dry yeast and give it a gentle stir
- Let sit undisturbed for 5-8 minutes until it gets foamy and smells slightly yeasty (if nothing happens, your yeast might be dead – start over)
- You should see bubbles forming on the surface – that’s your yeast waking up and ready to party
Mixing the Dough:
- Add vegetable oil and white vinegar to the yeast mixture
- In a separate bowl, whisk together all-purpose flour, cake flour (or cornstarch), baking powder, and salt
- Pour the dry ingredients into the wet mixture gradually
- Mix with a wooden spoon until a rough dough forms and all the dry flour is incorporated.
- The dough will look messy at this point – totally normal
Kneading to Silky Smoothness:
- Dust your work surface lightly with flour
- Turn out the dough and start kneading with the heel of your hand
- Push, fold, turn, repeat for 8-10 minutes until the dough transforms from sticky to smooth and elastic
- The dough should bounce back slowly when you poke it
- If it’s too sticky, add flour one tablespoon at a time (but resist over-flouring – slightly tacky is actually good)
- Form into a smooth ball
First Rise – Patience Pays Off:
- Lightly oil a large clean bowl
- Place dough ball in the bowl and turn to coat with oil
- Wrap it securely with plastic wrap or cover it with a damp kitchen towel.
- Set in a warm, draft-free spot
- Wait for 1 to 1.5 hours until doubled in size – use this time to prep your bao bun fillings
- The dough should feel puffy and light when you gently press it
Shaping Your Homemade Bao Buns
Dividing and Portioning:
- Punch down the risen dough gently to release air bubbles
- Turn out onto a lightly floured surface
- Roll into a long log shape about 12-14 inches long
- Cut into equal pieces (12-14 portions, each roughly 2 ounces)
- Roll each piece into a smooth ball by cupping it in your palm and rolling in circles
- Cover with a damp towel to prevent drying while you work
The Folding Technique:
- Take one dough ball and flatten it with your palm into a disc
- Use a small rolling pin (or a wine bottle works in a pinch) to roll into an oval about 4 inches long and 3 inches wide
- The center should be slightly thicker than the edges to prevent tearing when folded
- Brush the top surface lightly with neutral oil – this prevents the bun from sticking to itself and creates those beautiful pull-apart layers
- Place a chopstick across the center of the oval, slightly off-center toward one end
- Fold the dough over the chopstick like a taco, pressing gently at the edges but not sealing completely
- Carefully slide out the chopstick while holding the fold in place
- Place on a parchment square to prevent sticking – this is crucial for easy removal later
Second Rise – Almost There:
- Arrange shaped buns on parchment squares in your steamer, leaving 2 inches between each
- Cover loosely with a kitchen towel
- Let rise for 30-45 minutes until noticeably puffier and slightly increased in size
- They won’t double, but should feel lighter and airier when you gently lift one
- Don’t skip this step – it’s what gives you that final cloudlike texture
Steaming to Pillowy Perfection
Setup Your Steaming Station:
- Fill a large pot or wok with water about 2 inches deep
- Bring to a rolling boil over high heat
- Place bamboo steamer or metal basket over the water (make sure water doesn’t touch the bottom of the steamer)
- Reduce heat to medium-high to maintain steady steam
- Have a clean kitchen towel ready to wrap the steamer lid – this catches condensation drips that cause wrinkles
The Steaming Process:
- Working in batches if needed, place buns in steamer leaving space between each
- Wrap the steamer lid with the kitchen towel and secure with a rubber band (trust me, water dripping on your buns ruins them and creates wrinkled surfaces)
- Cover and steam for 12-15 minutes without lifting the lid (peeking releases steam and affects cooking)
- You’ll know they’re done when they look puffy, matte white, and spring back when lightly touched
- Turn off heat and let sit for 2 minutes before opening – sudden temperature changes can make them collapse
Final Touches:
- Carefully remove steamer from heat
- Let buns rest in the closed steamer for 2 minutes to prevent collapsing
- Open lid away from yourself to avoid the steam blast
- Transfer buns to a wire rack or plate
- Serve immediately while warm and impossibly soft
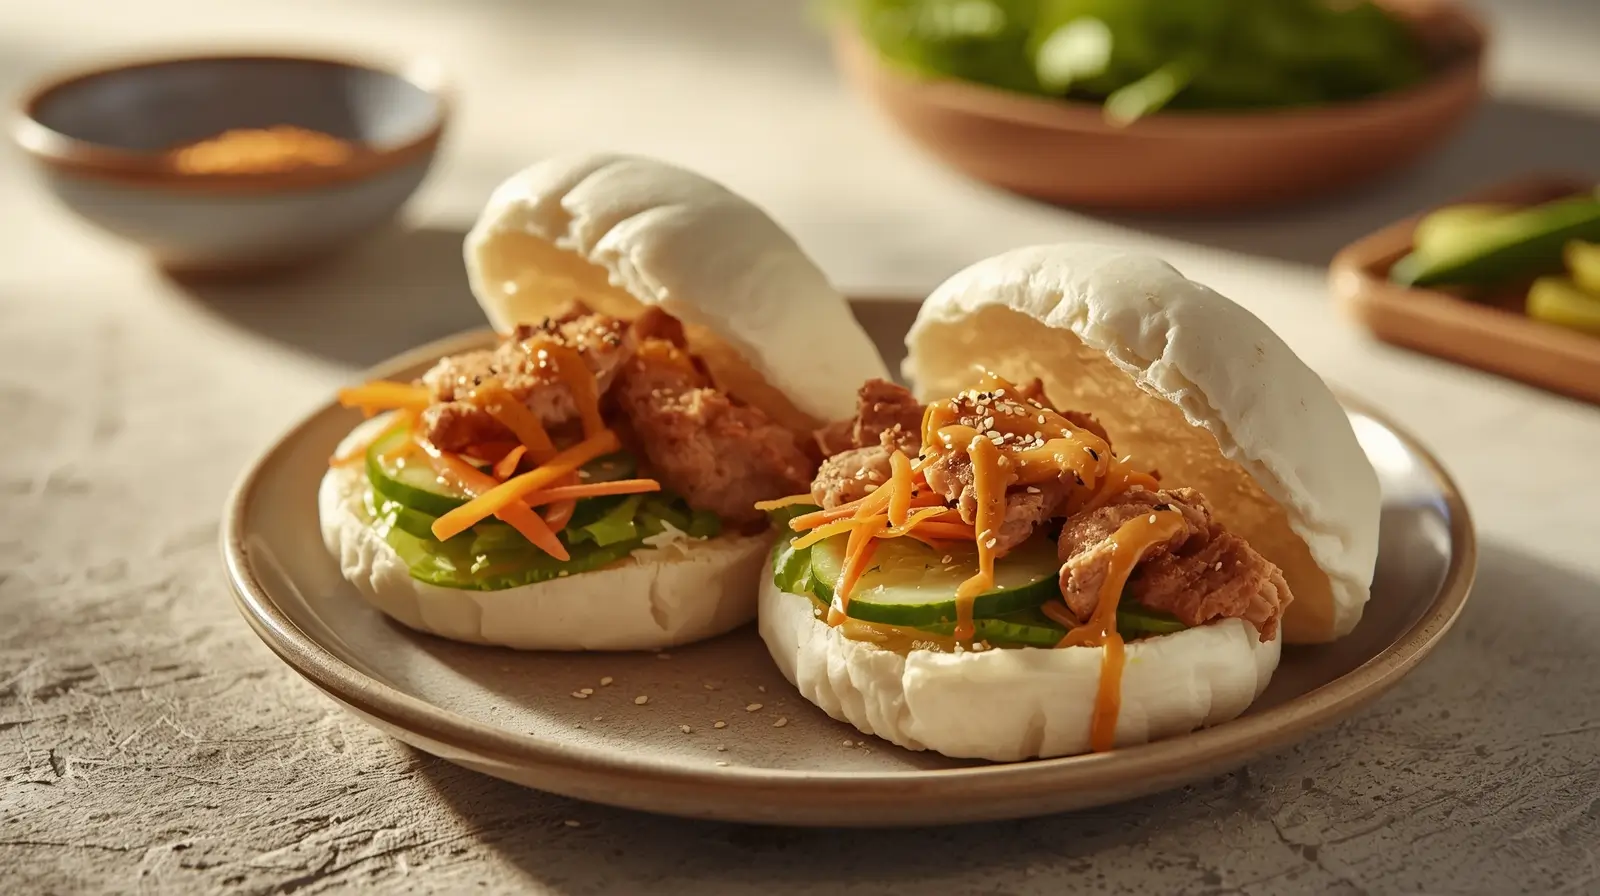
- Gently open each bun and fill with your choice of proteins, pickled vegetables, fresh herbs, and sauces
The Perfect Canvas for Creative Fillings
What makes steamed bao buns so beloved isn’t just their pillowy texture – it’s their incredible versatility. Unlike heavier breads that compete with fillings, these soft buns act as the perfect neutral backdrop that lets your bao bun fillings shine. The slightly sweet, subtly yeasty flavor complements everything from rich braised meats to fresh vegetables.
Nutrient Information (Per Bun, Unfilled)
| Nutrient | Amount per Bun |
|---|---|
| Calories | 155 |
| Total Fat | 3g |
| Saturated Fat | 0.5g |
| Cholesterol | 2mg |
| Sodium | 125mg |
| Total Carbohydrates | 28g |
| Dietary Fiber | 1g |
| Sugars | 4g |
| Protein | 4g |
| Calcium | 4% DV |
| Iron | 8% DV |
Keep reading to discover the story and secrets behind perfect bao!
Why This Recipe Will Transform Your Cooking
- Creates authentic, restaurant-quality steamed bao buns with that signature soft texture
- Uses simple pantry ingredients – no exotic items required
- Detailed instructions walk you through every step
- Versatile base that works with traditional Asian street food bao fillings or creative gua bao fusion filling experiments
- More economical than buying frozen bao, and the taste difference is night and day
- Impressive enough for dinner parties but easy enough for weekends
From Taiwan’s Night Markets to Your Kitchen
Walk through any night market in Taipei, and you’ll find vendors selling gua bao – those iconic Taiwanese stuffed buns that inspired a global craze. The history of steamed bao buns stretches back to Fuzhou in China’s Fujian province, but it’s the Taiwanese interpretation that captured the world’s imagination. When David Chang introduced his version at Momofuku in New York, these soft pillows suddenly became the hottest thing in Western dining.
The Chemistry Behind the Clouds
The magic lies in understanding what makes steamed bao buns different from other breads. Unlike baked goods that develop a crust, steaming keeps everything soft by surrounding the dough with moist heat. The combination of yeast and baking powder creates a double-leavening system. The vinegar helps activate the baking powder and keeps the dough snow-white. The oil brushed between layers before folding creates those signature pull-apart textures.
Why Home Cooks Choose This Recipe
| Feature | Store-Bought Frozen Bao | Homemade Steamed Bao Buns |
|---|---|---|
| Texture | Often gummy or dense | Cloud-soft and pillowy |
| Flavor | One-dimensional | Subtly sweet, fresh yeast notes |
| Freshness | Variable after thawing | Peak freshness guaranteed |
| Customization | Fixed size and shape | Adjust size, sweetness, add colors |
| Ingredient Control | Mystery additives and preservatives | Know exactly what goes inside |
| Cost per Bun | $0.75-$1.50 | $0.30-$0.50 |
Selecting Your Ingredients Like a Pro
The ingredient list is short, but quality matters. You don’t need anything exotic, but choosing the right versions makes a real difference in achieving that authentic Asian street food bao texture.
- Flour Matters: All-purpose flour with 10-12% protein content works best. The addition of cake flour or cornstarch creates that melt-in-your-mouth softness.
- Fresh Yeast is Key: Check the expiration date on your yeast. Dead yeast is the number one reason bao dough fails to rise.
- Whole Milk for Richness: The fat creates tenderness and adds subtle richness.
- Quality Matters for Fillings: Since the bun itself is mild, your bao bun fillings should be bold and flavorful.
Make-Ahead Strategy
You can make the dough through the first rise, then refrigerate it overnight. The slow, cold fermentation actually develops better flavor. You can also freeze shaped, uncooked buns and steam directly from frozen, adding 4-5 minutes to the cooking time.
Insider Secrets for Bao Mastery
After making countless batches, I’ve picked up techniques that separate okay buns from stellar ones.
Common Pitfalls and How to Dodge Them
- Dense, Heavy Buns: Not kneading enough or using water that’s too hot. The dough needs 8-10 minutes of kneading.
- Wrinkled Surface: Condensation drips from the lid. Always wrap your steamer lid with a kitchen towel.
- Buns That Collapse: Opening too quickly creates temperature shock. Let them rest for 2 minutes after turning off heat.
- Uneven Cooking: Overcrowding restricts steam circulation. Leave 2 inches between buns.
- Sticky Situations: Don’t skip the parchment squares.
Advanced Techniques
Temperature Tricks: Heat your oven to 200°F, turn it off, then let your dough rise inside with the door slightly cracked.
The Poke Test: Before steaming, gently poke a risen bun. If the indentation springs back slowly, you’re ready.
Steam in Stages: For dinner parties, steam buns in batches as guests arrive. Fresh buns beat reheated ones every time.
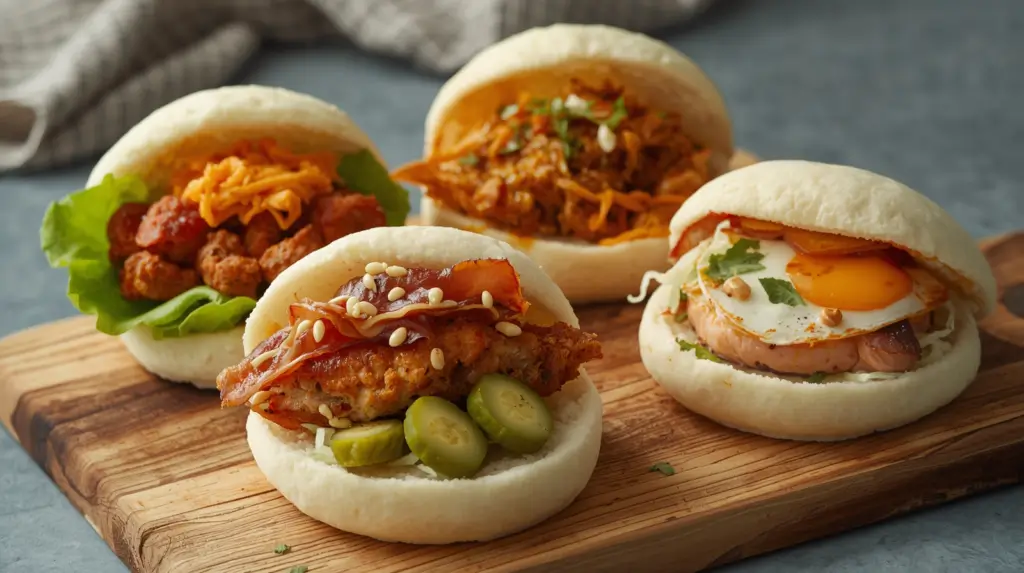
Creative Filling Ideas That Go Beyond Traditional
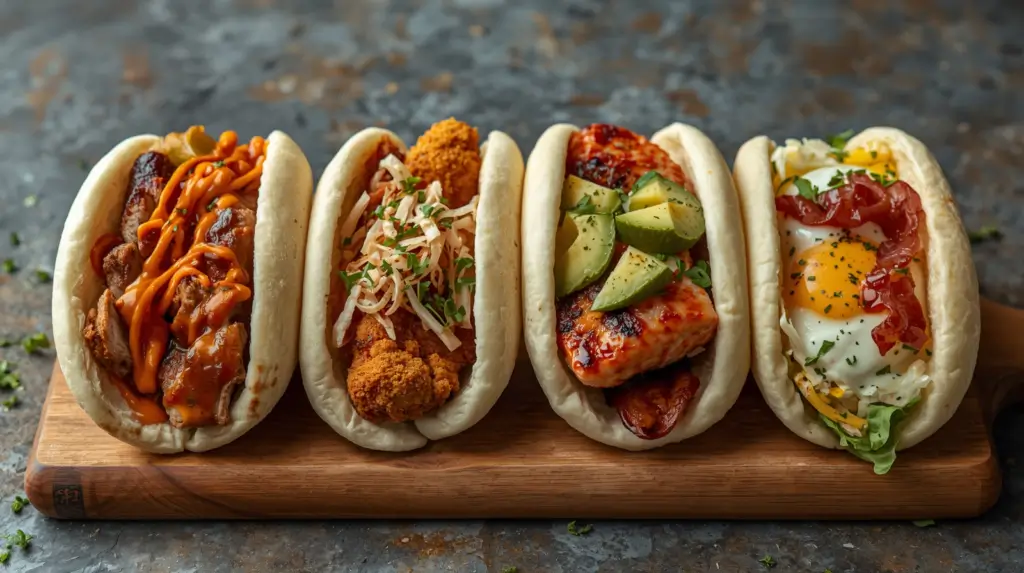
Gua Bao Fusion Filling Adventures
Peking Duck Style: Shredded duck with crispy skin, cucumber matchsticks, scallions, and sweet bean sauce.
Vegetarian Mushroom: Soy-glazed shiitake and oyster mushrooms, Asian slaw, pickled ginger, and sesame seeds.
Korean BBQ Twist: Bulgogi beef with kimchi, gochujang aioli, and butter lettuce.
Southern Fried Chicken: Buttermilk fried chicken, spicy mayo, bread-and-butter pickles, and coleslaw.
Miso-Maple Salmon: Pan-seared salmon with miso-maple glaze, pickled cucumbers, avocado, and microgreens.
Breakfast Bao: Scrambled eggs, crispy bacon, sharp cheddar, and hot sauce.
Indian-Inspired: Tandoori chicken with mint chutney, pickled red onions, and cucumber raita.
Mediterranean Fusion: Herb-marinated falafel, tahini sauce, chopped tomatoes, and pickled turnips.
Beautiful Presentation & Perfect Meal Combinations
Plating for Maximum Impact
Serve your homemade bao buns on a rustic wooden board or slate platter. Arrange them standing upright with small bowls of extra sauces nearby. Fresh herb sprigs scattered around add pops of color and hint at the flavors inside. For casual dinners, serve them straight from the bamboo steamer at the table.
Side Dishes That Complete the Experience
Light and Fresh Options:
- Asian-style cucumber salad made with rice vinegar and sesame oil
- Edamame with sea salt and lime
- Quick-pickled vegetables for crunch and tang
- Seaweed salad with sesame seeds
Heartier Accompaniments:
- Chinese hot and sour soup
- Stir-fried bok choy with garlic
- Crispy salt and pepper tofu
- Steamed jasmine rice
Beverage Pairings:
- Jasmine or oolong tea (hot or iced)
- Lychee or mango bubble tea
- Sparkling water with lime and mint
Keeping Your Bao Fresh and Loving Your Leftovers
Store cooled, unfilled buns in an airtight container at room temperature for up to 2 days. For longer storage, freeze them in a single layer, then transfer to freezer bags. They keep for up to 3 months frozen. Steam directly from frozen for 5-6 minutes until heated through.
Reheating Like a Pro: Never microwave bao unless you want rubber. Always resteam for 3-4 minutes over boiling water until soft and warm.
Creative Uses for Leftover Buns: Split and pan-fry in butter for a crispy-edged breakfast sandwich base. Tear into pieces and add to soup. Toast lightly and spread with peanut butter and banana.
FAQ: Everything You’re Wondering About Steamed Bao Buns
Why didn’t my bao dough rise? Most likely: dead yeast or liquid that was too hot. Yeast needs warmth but temperatures above 120°F kill it. Always proof your yeast first – if it doesn’t foam within 10 minutes, grab a fresh packet.
Can I make these without a bamboo steamer? Absolutely! A metal steaming basket works great, or rig a setup with a heat-safe plate on an upside-down bowl inside a pot.
How do I get my buns pure white like restaurant bao? Use white vinegar in the dough, bleached all-purpose flour, and don’t over-steam. Make sure your water is at a rolling boil before you start.
My buns came out tough and chewy. What happened? Probably over-kneading, using too much flour, or over-steaming. The dough should be soft and slightly tacky.
Can I use instant yeast instead of active dry yeast? Yes! Use the same amount but mix it directly into the dry ingredients. The rise time might be 10-15 minutes shorter.
How do I know when the buns are fully steamed? They should look puffy, matte white, and spring back when gently touched. If they look wet or shiny, give them another minute.
What’s the secret to keeping bao buns soft for longer? Keep them covered while cooling and don’t let them dry out. A light brush of oil on the surface before storing helps maintain moisture.
Can I make the dough in a stand mixer? Definitely! Use the dough hook on medium-low speed for 6-8 minutes until smooth and elastic.
Ready to fill your kitchen with clouds of steam and create pillowy steamed bao buns that’ll make you feel like a culinary genius? Trust me, once you nail these homemade bao buns and experiment with Asian street food bao fillings and gua bao fusion filling combinations, you’ll be finding excuses to make them every weekend!
Leave a Review
There are no reviews yet. Be the first one to write one.