Easy Chickpea and Cauliflower Curry
The first time I made this easy chickpea and cauliflower curry, I was convinced I’d forgotten something. How could a dish this flavorful come together with just one pot and a handful of pantry staples? But there I was, twenty minutes in, watching golden turmeric swirl into coconut milk while my kitchen smelled like I’d been cooking all day.
This one pot chickpea cauliflower curry has become my answer to those nights when I want something comforting but don’t want to face a sink full of dishes afterward. It’s vegan, it’s creamy, and somehow it tastes even better the next day when all those spices have had time to really get to know each other.
Table of Contents
What You’ll Need for This Vegan Chickpea Cauliflower Curry
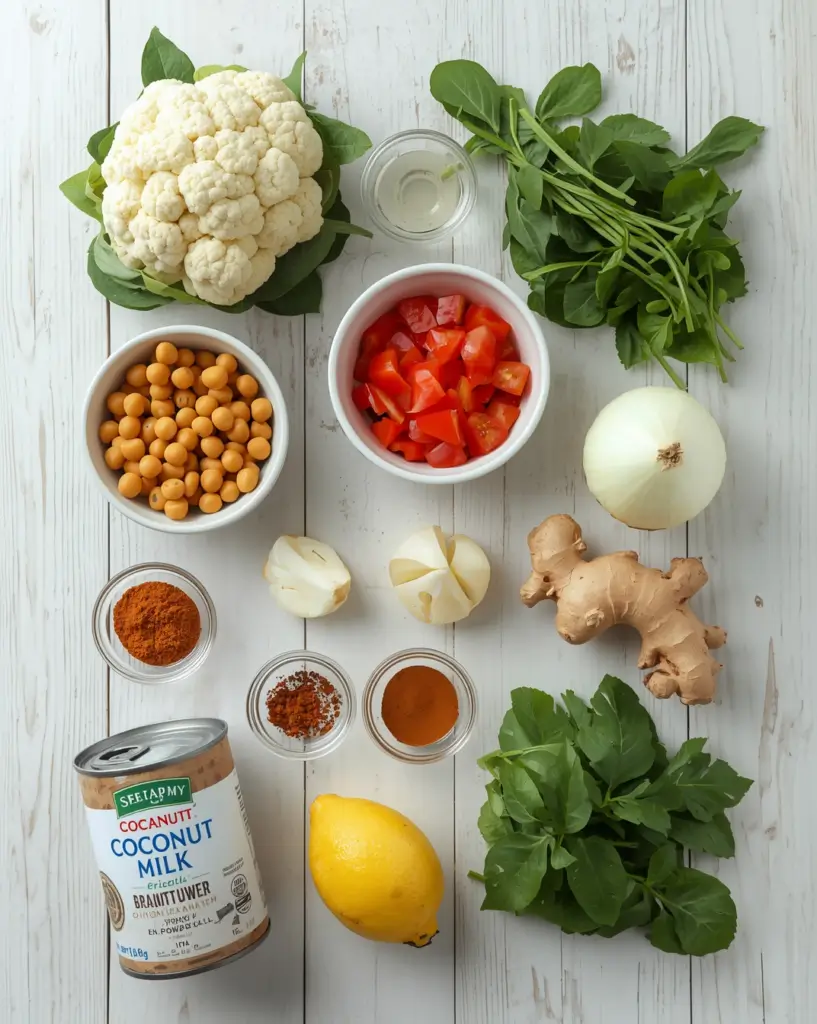
For the Curry:
- 2 tablespoons coconut oil (or any neutral oil)
- 1 large yellow onion, diced small
- 1 medium head cauliflower, cut into bite-sized florets (about 4 cups)
- 4 cloves garlic, minced fine
- 2-inch piece fresh ginger, grated (don’t use powdered here, trust me)
- 2 tablespoons curry powder (medium heat works best)
- 1 teaspoon ground cumin
- 1 teaspoon ground coriander
- 1/2 teaspoon turmeric
- 1/4 teaspoon cayenne pepper (adjust to your heat preference)
- 1 can (14 oz) diced tomatoes with their juice
- 1 can (14 oz) full-fat coconut milk
- 2 cans (15 oz each) chickpeas, drained and rinsed
- 2 cups vegetable broth or water
- 1 teaspoon salt (plus more to taste)
- 2 teaspoons maple syrup or coconut sugar
- 2 cups fresh spinach or baby kale
- Juice of half a lemon
To Serve:
- Steamed basmati rice or quinoa
- Fresh cilantro, chopped
- Lime wedges
- Naan bread (optional)
Smart Swaps: Out of fresh ginger? You can use 1 teaspoon of ground ginger in a pinch, though the flavor won’t be quite as bright. Swap chickpeas for white beans or add cubed sweet potato for variation. For an even creamier coconut chickpea curry, use two cans of coconut milk instead of one plus broth.
Time Investment
- Prep time: 10 minutes
- Cooking time: 25 minutes
- Total time: 35 minutes
This is genuinely one of those weeknight chickpea curry recipes that feels like a cheat code. From chopping your first onion to sitting down with a steaming bowl, you’re looking at just over half an hour. That’s less time than most delivery apps take, and you only dirty one pot.
How to Make This Quick Chickpea Curry
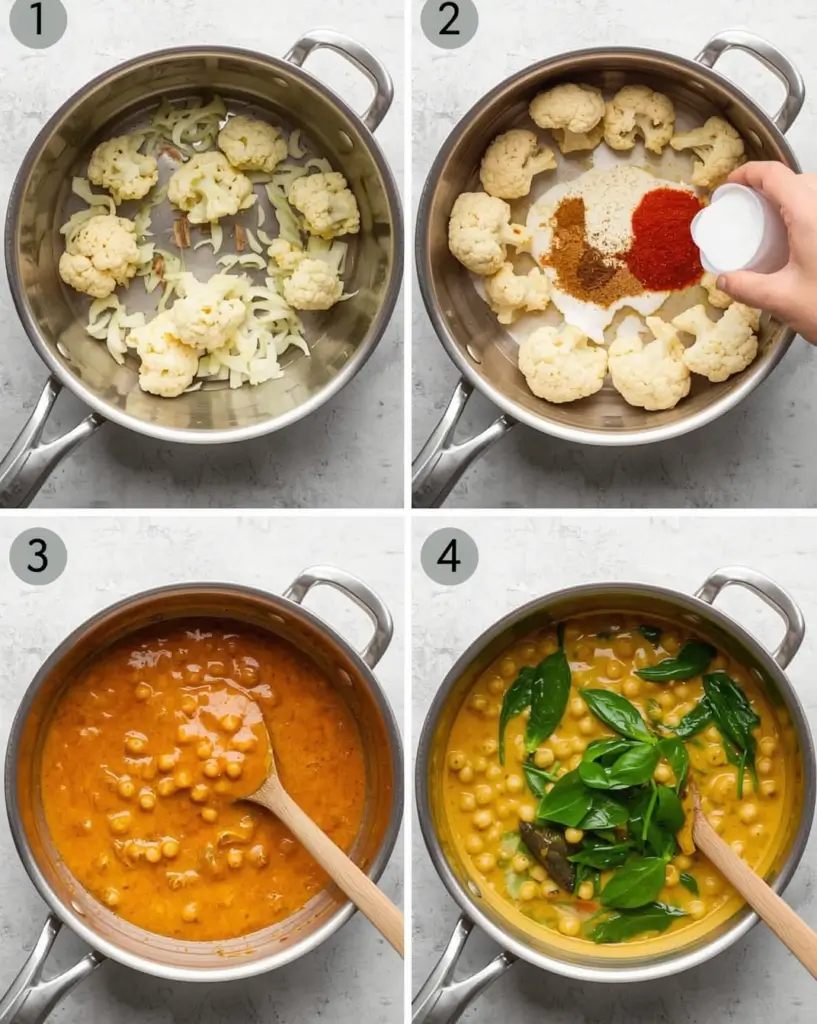
Step 1: Starting with Your Aromatics
- Heat the coconut oil in a large, deep skillet or Dutch oven over medium heat until it shimmers.
- Add your diced onion with a pinch of salt. Let it cook for about 5 minutes, stirring every so often, until it turns soft and translucent with those golden edges starting to show.
- Toss in the cauliflower florets and cook for 3-4 minutes, stirring once or twice. You want them to start picking up a little color on the edges.
Here’s something I learned after making bland curry a few times: don’t rush this step. Those browned bits on the cauliflower and onion create a flavor base that you just can’t get if you hurry through it.
Step 2: Blooming Your Spices
- Push everything to the sides of your pot. Drop the garlic and ginger into that cleared center space and let them sizzle for about 30 seconds until your kitchen smells incredible.
- Add all your ground spices—the curry powder, cumin, coriander, turmeric, and cayenne. Stir everything together quickly so the spices coat all the vegetables.
- Cook for just one minute, stirring constantly. This is called “blooming” and it wakes up all those dormant flavors in the dried spices.
Watch carefully here. Once those spices hit the hot pan, you’ve got maybe 60 seconds before they can turn from fragrant to bitter.
Step 3: Building the Creamy Coconut Sauce
- Pour in the diced tomatoes, coconut milk, chickpeas, and vegetable broth. Stir in the salt and maple syrup (that touch of sweetness balances everything beautifully).
- Bring the whole thing to a gentle boil, then reduce the heat to medium-low.
- Let this simmer uncovered for 12-15 minutes, stirring occasionally.
- You’ll know it’s ready when the cauliflower is fork-tender but not mushy, and the sauce has thickened enough to coat the back of a spoon.
- During the last 2 minutes, stir in your fresh greens. They’ll wilt down and add this beautiful pop of color.
- Turn off the heat, then add the lemon juice. Give it a taste and adjust the seasoning—maybe more salt, maybe another squeeze of lemon.
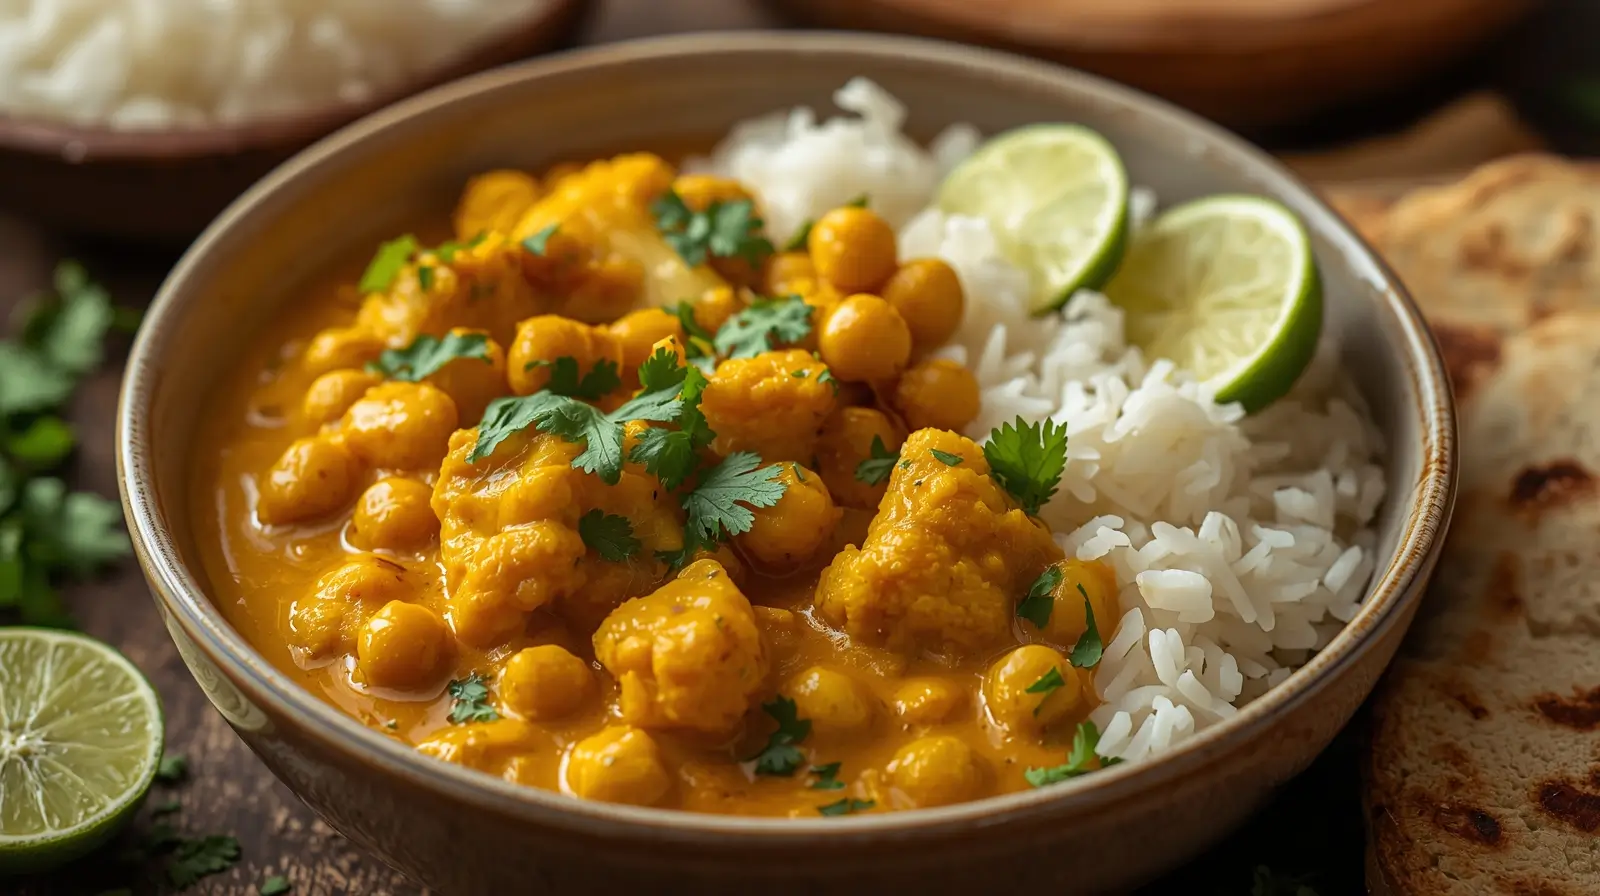
The texture should be creamy and thick enough to cling to your rice, but still saucy enough that it pools nicely in the bowl.
Nutrition Breakdown
Per serving (recipe makes 6 servings):
- Calories: 295
- Protein: 11g
- Carbohydrates: 35g
- Fat: 14g
- Fiber: 10g
- Iron: 25% DV
- Vitamin C: 90% DV
This healthy vegan chickpea curry delivers substantial plant-based protein and an impressive amount of fiber without leaving you feeling heavy. The healthy fats from the coconut milk actually help your body absorb all those anti-inflammatory spices better.
Ways to Customize This One Pot Chickpea Cauliflower Curry
Make It Creamier: Use two cans of coconut milk instead of one plus broth for an ultra-rich version that’s pure comfort food.
Add More Veggies: Bulk it up with diced bell peppers, green beans, zucchini, or cubed sweet potato. More vegetables mean more nutrients and fiber while keeping this a quick weeknight meal.
Adjust the Heat: Double the cayenne or add a sliced fresh chili with the onions if you want more kick. Cut the cayenne in half or skip it entirely for a milder version that’s still packed with flavor.
Boost the Protein: Stir in a cup of red lentils with the liquids (they’ll cook right in the curry). Or add cubed tofu in the last 5 minutes for extra plant-based protein.
Extra Greens: I sometimes add a whole bag of baby spinach or kale just because I can. It wilts down to almost nothing and adds tons of nutrients.
Serving Ideas for Your Weeknight Chickpea Curry
This curry is incredibly versatile beyond the traditional rice bowl. I’ve stuffed it into warm pita pockets with a drizzle of tahini sauce, served it over crispy roasted potatoes for a hearty brunch, and even used it as a filling for samosas when I was feeling ambitious.
For a lighter option, serve it over cauliflower rice or zucchini noodles. For something more substantial on a cold night, ladle it over fluffy naan bread or stuff it into baked sweet potatoes.
A handful of toasted cashews or sliced almonds adds incredible texture and richness. So does a sprinkle of toasted coconut flakes on top for that extra tropical touch.
What Not to Do
Cutting the cauliflower too large: Big florets take forever to cook through. You’ll end up with either crunchy cauliflower or overcooked chickpeas. Keep your pieces bite-sized, about the size of a walnut.
Burning your spices: Once those dried spices hit the hot oil, you’re on the clock. Stir constantly and have your liquids ready to pour in. Burnt spices taste bitter and there’s no fixing it.
Using lite coconut milk when you really want creamy: I know it might seem healthier, but lite coconut milk makes a watery curry that’s just okay instead of spectacular. For a truly satisfying meal, embrace the full-fat coconut milk—it’s what makes this creamy coconut chickpea curry so irresistible.
Forgetting the acid at the end: That squeeze of lemon juice isn’t optional. It brightens every single flavor in the pot and makes the difference between good curry and great curry.
Rushing the browning: Give those onions and cauliflower time to develop some color. Those caramelized bits are where the depth of flavor comes from.
Meal Prep and Storage
This easy chickpea and cauliflower curry is practically begging to be meal prepped. The cooked curry keeps beautifully in an airtight container for up to 5 days in the fridge. Honestly, it’s even better on day two or three when all those spices have really had time to get friendly with each other.
For meal prep, keep your curry separate from whatever grain you’re serving it with. The curry stays good in the fridge for 5 days, while rice lasts about the same. Assemble fresh when you’re ready to eat so nothing gets soggy.
To reheat, add a splash of water or vegetable broth since the curry thickens as it sits. Warm it gently on the stove over medium-low heat, stirring occasionally. Microwave works too—I do 90-second intervals at 70% power to keep it from getting nuclear hot around the edges while staying cold in the middle.
Freezing is absolutely an option with this curry. Portion it into containers or freezer bags and it’ll keep for up to 3 months. Let it thaw in the refrigerator overnight, then reheat it as normal.
Final Thoughts on This Easy Chickpea and Cauliflower Curry
What I love most about this recipe is how it proves that vegan cooking doesn’t have to be complicated or time-consuming. You’re getting all these warm, complex flavors from everyday ingredients, and you’re doing it all in one pot.
It’s become my go-to creamy coconut chickpea curry for busy weeknights when I want real food that actually tastes like something. The kind of meal that makes you feel good while you’re eating it and even better afterward because you’re not facing a mountain of dishes.
Give it a try this week and let me know what you think. I’d love to hear how you customize it. Share your curry creations in the comments.
Common Questions
Can I use frozen cauliflower instead?
Yes! Add it frozen directly to the pot when you add the liquids, and give it an extra 3-4 minutes of cooking time. No need to thaw first, though it might release some extra water into your curry, so you may need less broth.
How can I make this gluten-free?
The curry itself is naturally gluten-free. Just make sure your curry powder doesn’t have any hidden gluten fillers (most don’t), and serve it with rice or quinoa instead of naan.
How spicy is this really?
As written, it’s got a gentle warmth but nothing that’ll make you sweat. The cayenne gives it a subtle kick. If you’re sensitive to heat, cut it in half or leave it out. If you want it spicier, double the cayenne or add a sliced fresh chili with the onions.
Can I make this in an Instant Pot?
Absolutely. Use the sauté function for the onions, cauliflower, garlic, ginger, and spices. Then add everything else, seal the lid, and cook on high pressure for 4 minutes with a quick release. Stir in the greens and lemon juice after you open it up.
Why does this taste better the next day?
The spices continue to infuse the sauce as it sits, and all the flavors have more time to meld together. This is true for most curries and stews—they just get better with time!
Leave a Review
There are no reviews yet. Be the first one to write one.