How to Make Gluten Free Desserts That Taste Amazing
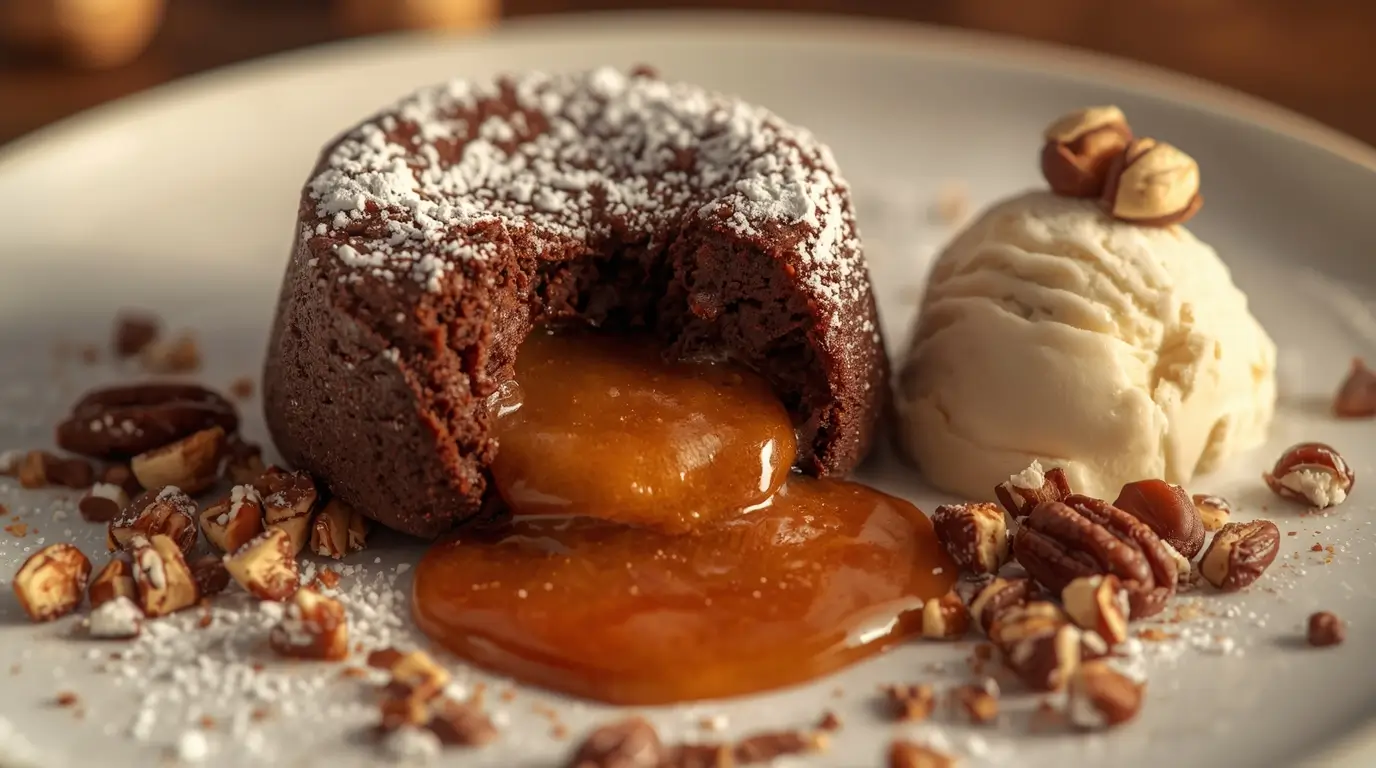
When you cut into a perfectly baked molten praline cake and watch that warm, nutty center ooze onto your plate, you’ll understand why this has become one of the most beloved gluten free desserts in modern baking. This isn’t just another chocolate lava cake knock-off ; it’s a sophisticated marriage of buttery praline and molten magic that happens to be naturally gluten-free. Sometimes, the best recipes are born from simple needs — using what’s on hand and turning it into something warm, comforting, and unexpectedly indulgent. That’s often how classics begin: from leftovers, a sudden craving, or a moment of spontaneous inspiration.
This simple gluten free desserts recipe delivers restaurant-quality results without requiring culinary school training or fancy equipment. The naturally gluten-free base means everyone at your table can enjoy this show-stopping finale, and trust me , they won’t miss the wheat for a second.
Table of Contents
After the step-by-step recipe, discover expert techniques, variations, and secrets to perfecting this gluten free dessert every single time.
Recipe Overview
| Prep Time | Cook Time | Total Time | Servings |
|---|---|---|---|
| 25 mins | 12 mins | 37 mins | 6 individual cakes |
Ingredients
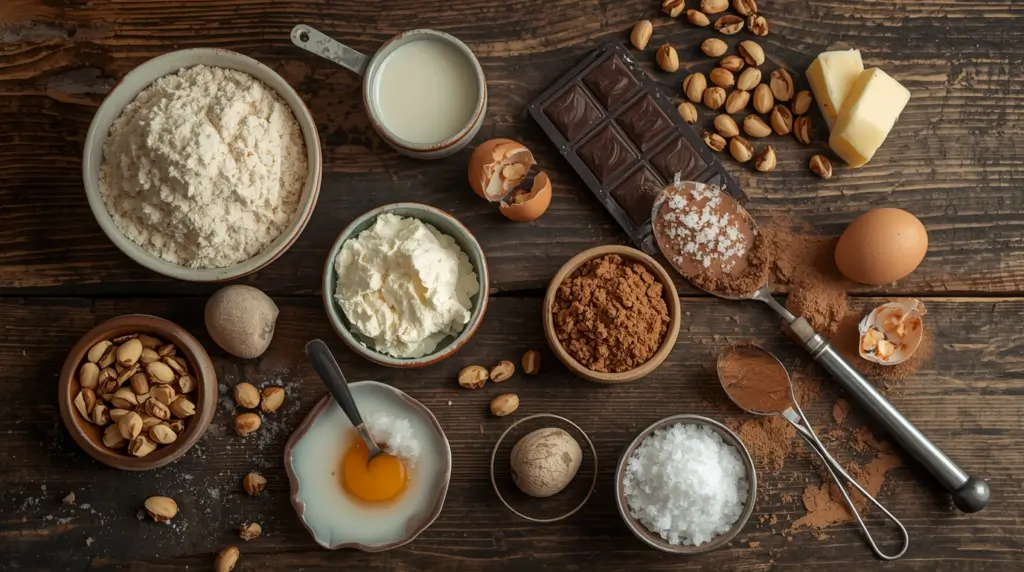
For the Praline Center:
- 3/4 cup hazelnuts (or pecans), toasted and roughly chopped
- 1/2 cup granulated sugar
- 2 tablespoons water
- 1/4 teaspoon sea salt
- 2 tablespoons heavy cream
For the Cake Batter:
- 6 oz high-quality dark chocolate (60-70% cacao), chopped
- 10 tablespoons unsalted butter, cut into pieces
- 3 large eggs
- 3 large egg yolks
- 1/3 cup granulated sugar
- 1/4 cup light brown sugar, packed
- 1/4 cup almond flour (finely ground)
- 2 tablespoons unsweetened cocoa powder
- 1/2 teaspoon vanilla extract
- 1/4 teaspoon instant espresso powder (optional but recommended)
- Pinch of salt
For Preparing Ramekins:
- 2 tablespoons softened butter
- 3 tablespoons granulated sugar (for coating)
For Serving:
- Vanilla ice cream or whipped cream
- Extra praline pieces for garnish
- Powdered sugar for dusting
Recipe Variations & Adaptations
- Nut-Free Version: Replace praline with a caramel-sea salt center using only sugar, cream, and butter
- Different Nuts: Pecans, almonds, or walnuts work beautifully in place of hazelnuts
- Extra Decadent: Add 2 tablespoons of praline paste to the batter itself for double praline flavor
- Dairy-Free Option: Use coconut cream instead of heavy cream and dairy-free chocolate
- Make-Ahead Friendly: Assemble unbaked cakes up to 24 hours ahead and refrigerate, adding 2-3 minutes to baking time
- White Chocolate Version: Substitute white chocolate for dark chocolate and add a tablespoon of lemon zest for balance
Timing & Temperature Guide
Planning and Timing
Good gluten free desserts require precision timing, and molten cakes are no exception. The praline can be made up to a week in advance, making this an excellent choice for dinner parties. The actual assembly takes about 15 minutes, and the 12-minute bake time is critical ; set a timer and don’t walk away.
Optimal Temperature and Texture Requirements
The magic happens at exactly 425°F (220°C). This high temperature creates a set outer shell while keeping the center gloriously molten. The praline center should be at room temperature before adding to the batter – cold praline will sink and won’t create that perfect lava effect.
Preparation Timeline Table
| Phase | Temperature | Duration |
|---|---|---|
| Praline Making | 340°F (171°C) sugar temp | 8-10 minutes |
| Praline Cooling | Room temperature | 20 minutes minimum |
| Chocolate Melting | Double boiler | 5-7 minutes |
| Batter Assembly | Room temperature | 10 minutes |
| Oven Preheating | 425°F (220°C) | 15 minutes |
| Baking Time | 425°F (220°C) | 11-13 minutes |
| Resting Period | Room temperature | 1 minute |
Step-by-Step Instructions: From Prep to Plate
Creating the Praline Center
Toast the Nuts:
- Spread hazelnuts on a baking sheet and toast at 350°F for 8-10 minutes
- Rub warm nuts in a kitchen towel to remove most of the papery skins
- Chop roughly into small pieces, leaving some larger chunks for texture
- Set aside to cool completely
Make the Praline:
- Line a small baking sheet with parchment paper and set near the stove
- In a heavy-bottomed saucepan, combine sugar and water
- Cook over medium heat without stirring until the sugar has completely dissolved
- Once dissolved, increase heat and cook until amber caramel forms (340°F on candy thermometer)
- Remove from heat and immediately stir in toasted nuts and sea salt
- Carefully add heavy cream (it will bubble vigorously)
- Pour onto prepared parchment and spread into a thin layer
- Let cool completely, then break into pieces
- Reserve 6 tablespoon-sized chunks for the molten centers
- Crush remaining praline into smaller bits for garnish
Preparing the Baking Vessels
Ramekin Preparation:
- Generously butter six 6-ounce ramekins using upward strokes
- Add a spoonful of granulated sugar to each ramekin
- Tilt and rotate to coat all surfaces completely
- Tap out excess sugar
- Set the prepared ramekins on a baking sheet to make handling easier
- Refrigerate while preparing batter
Crafting the Perfect Batter
Chocolate Base:
- Create a double boiler by placing a heatproof bowl over simmering water
- Add chopped chocolate and butter to the bowl
- Stir occasionally until completely melted and smooth
- Remove from heat and let cool for 5 minutes
- Stir in vanilla extract and espresso powder
Egg Mixture:
- In a separate large bowl, whisk together whole eggs and egg yolks
- Add both sugars and whisk vigorously for 2-3 minutes until pale and slightly thickened
- The mixture should fall in ribbons from the whisk
- This aeration is crucial for the proper texture
Final Assembly:
- Sift almond flour and cocoa powder together
- Gently fold the melted chocolate mixture into the egg mixture
- Sift the dry ingredients over the chocolate-egg mixture
- Fold gently with a spatula until just combined and no streaks remain
- Don’t overmix ; some small lumps are fine
Baking Process: Achieving Molten Perfection
Filling the Ramekins:
- Remove prepared ramekins from refrigerator
- Fill each ramekin halfway with batter (about 3 tablespoons)
- Press one chunk of praline into the center of each
- Cover with remaining batter, filling to about 3/4 full
- Gently tap ramekins on counter to release air bubbles
- Ensure praline is completely covered by batter
The Critical Bake:
- Place baking sheet with ramekins in the center of preheated 425°F oven
- Bake for exactly 11-13 minutes – set a timer
- Cakes are done when edges are set and slightly pulling away from sides
- Centers should still jiggle slightly when gently shaken
- Tops should look dry and slightly cracked
- Do not overbake – better to underbake slightly than overbake
The Grand Finale
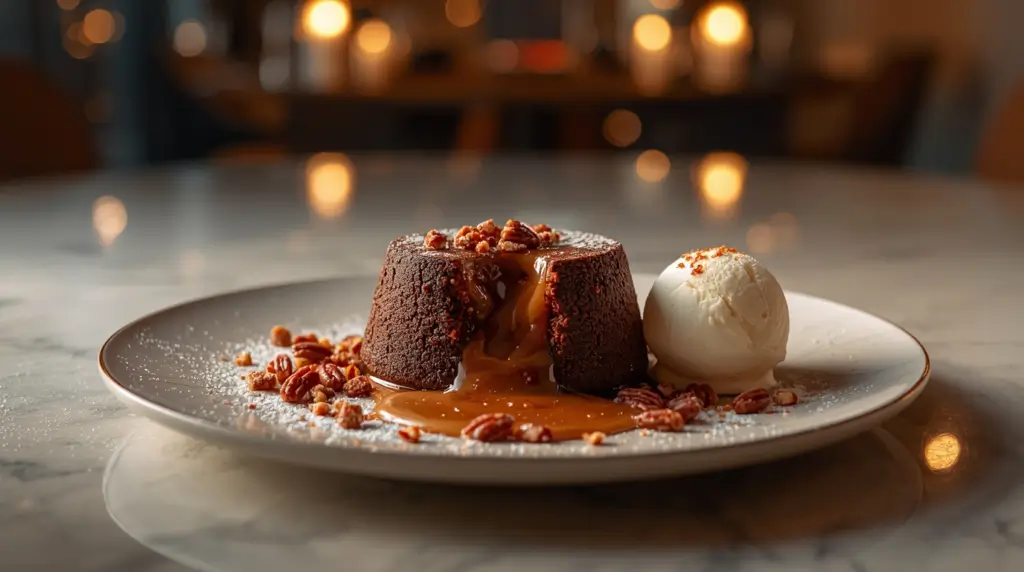
Unmolding and Plating:
- Remove from oven and let rest for exactly 1 minute
- Run a thin knife around the edge of each ramekin
- Place serving plate upside down over ramekin
- Using oven mitts, quickly flip both together
- Let rest for 10 seconds, then carefully lift ramekin
- If cake doesn’t release, gently tap the bottom
Final Touches:
- Dust with powdered sugar immediately
- Place a small scoop of vanilla ice cream beside each cake
- Scatter crushed praline pieces around the plate
- Serve immediately while centers are still molten
- Warn guests to cut carefully – the center is hot!
Nutritional Benefits Meet Incredible Flavor
This gluten free dessert recipes option proves that indulgence and smart ingredient choices aren’t mutually exclusive. Almond flour provides protein, healthy fats, and vitamin E, while dark chocolate delivers powerful antioxidants and mood-boosting compounds. The hazelnuts contribute heart-healthy monounsaturated fats, magnesium, and additional vitamin E.
| Nutrient | Amount per Serving |
|---|---|
| Calories | 485 |
| Total Fat | 32g |
| Saturated Fat | 16g |
| Cholesterol | 215mg |
| Sodium | 145mg |
| Total Carbohydrates | 42g |
| Dietary Fiber | 3g |
| Sugars | 34g |
| Protein | 8g |
| Vitamin E | 18% DV |
| Magnesium | 15% DV |
| Iron | 14% DV |
Curious to discover the story, secrets, and tips behind this recipe? Read on!
Why This Recipe Will Become Your Favorite
- Creates an impressive gluten free dessert that rivals any traditional version
- Among simple gluten free desserts, this delivers sophistication without complexity
- The praline center adds unexpected texture and caramelized depth to this gluten free dessert
- Naturally gluten-free means no alternative flours that change the texture
- Individual portions eliminate slicing drama and ensure everyone gets molten perfection
- Make-ahead friendly for stress-free entertaining with good gluten free desserts
From Classic Lava Cake to Praline Innovation
The molten chocolate cake became famous in the 1980s, but it took decades for bakers to realize that the best gluten free desserts never needed wheat flour in the first place. This gluten free desserts easy recipe embraces that truth while elevating the concept with a praline heart that transforms each bite into a multi-textured experience.
The Science Behind the Molten Magic
The magic happens through a balance of structure and tenderness ; eggs and almond flour hold the cake together while butter and chocolate keep it silky. The praline center softens into warm, flowing caramel with little pockets of crunchy nuts, creating that textural contrast that makes this special. I remember the first time I got the timing wrong (okay, maybe the first five times). That 11-13 minute window is your sweet spot, and every oven is slightly different, so watch carefully on your first attempt.
How This Recipe Became a Crowd-Pleaser
What makes this one of the good gluten free desserts that everyone requests isn’t just the dramatic presentation ; it’s the fact that gluten-free guests finally get to experience the magic of a molten cake without compromise. The almond flour actually makes the texture more interesting than traditional versions, with a slight nuttiness that complements the praline beautifully. This is what makes great gluten free dessert recipes so special.
| Feature | Traditional Lava Cake | Molten Praline Cake |
|---|---|---|
| Flour Base | All-purpose flour | Almond flour (naturally GF) |
| Center | Plain chocolate | Praline with nuts |
| Texture | One-note smooth | Multi-textured |
| Dietary Friendly | Contains gluten | Naturally gluten-free |
| Flavor Complexity | Chocolate forward | Layered caramel notes |
| Wow Factor | Classic | Unexpected upgrade |
Choosing the Best Ingredients for Maximum Flavor
Quality ingredients make the difference between good and extraordinary when crafting simple gluten free desserts and gluten free dessert recipes.
- Chocolate Selection: Use chocolate between 60-70% cacao. Higher percentages can be too bitter against the sweet praline, while lower percentages lack depth. Brands like Valrhona, Guittard, or Ghirardelli work beautifully.
- Almond Flour: Finely ground blanched almond flour is essential. Almond meal (with skins) creates a gritty texture. Bob’s Red Mill Super-Fine is reliable and consistent.
- Nuts for Praline: Toasting brings out essential oils and deepens flavor dramatically. Hazelnuts are traditional, but pecans offer buttery sweetness while walnuts add earthy notes.
- Butter Quality: European-style butter with higher fat content creates richer texture and better flavor. The extra investment is worth it in such a butter-forward recipe.
Make-Ahead Tips
The beauty of good gluten free desserts like this molten praline cake is their flexibility. Make the praline up to one week ahead and store in an airtight container at room temperature. The batter can be prepared and refrigerated in the ramekins up to 24 hours before baking – just add 2-3 minutes to the baking time since they’ll be starting cold.
For true make-ahead convenience, freeze unbaked cakes in their ramekins, well-wrapped, for up to one month. Bake directly from frozen, adding 4-5 minutes to the cooking time.
Insider Tips for Professional Results
Common Mistakes to Avoid
- The Overbake Disaster: Even 2 minutes too long eliminates the molten center. Every oven runs differently, so start checking at 11 minutes.
- Cold Ingredient Catastrophe: Room temperature eggs and cooled (but not cold) chocolate are essential for proper emulsification and even baking.
- Insufficient Greasing: A cake stuck in its ramekin is heartbreaking. Be generous with butter and thorough with sugar coating.
- Skipping the Rest: That 1-minute rest after baking allows the structure to set just enough for clean unmolding.
Advanced Techniques
Temperature Testing: Insert a cake tester or toothpick one inch from the edge. It should come out with moist crumbs. The center should be soft to the touch when gently pressed.
Praline Perfection: Don’t stir the sugar while it’s caramelizing – swirl the pan instead. Stirring can cause crystallization and a grainy texture.
The Double-Chocolate Method: For extra richness, use half dark chocolate and half milk chocolate in the batter while keeping the dark chocolate intensity in the praline.
Creative Variations on This Recipe
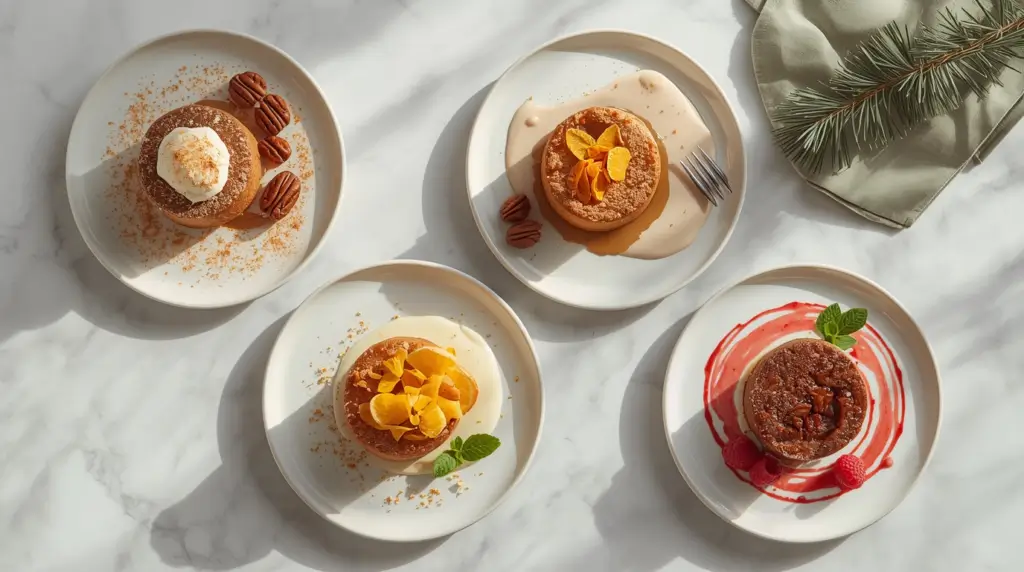
Seasonal Adaptations
Autumn Spice Version: Add 1/2 teaspoon cinnamon and 1/4 teaspoon cardamom to the batter. Use pecans in the praline and serve with maple whipped cream.
Winter Holiday Edition: Replace hazelnuts with chestnuts in the praline. Add a tablespoon of maple syrup and a pinch of nutmeg to the batter and serve with eggnog ice cream.
Spring Citrus Twist: Add zest of one orange to the batter. Use almonds in the praline and serve with orange crème anglaise.
Summer Berry Companion: Keep the recipe as is but serve with fresh raspberry coulis and a few whole berries for brightness against the rich chocolate.
Dietary Adaptations
Vegan Transformation: Replace eggs with aquafaba (chickpea water) – use 3/4 cup, whipped to stiff peaks. Use coconut cream instead of dairy cream in praline.
Keto-Friendly Version: Replace all sugar with monk fruit sweetener (use conversion chart on package). The texture may vary slightly, but it will still be delicious.
Stunning Presentation & Perfect Pairings
Presentation Ideas
Elevate your gluten free desserts easy presentation with restaurant-style plating techniques. Slice cake to reveal the molten center, creating a visual appeal that makes this one of the most impressive gluten free desserts recipes. Place the unmolded cake slightly off-center on a white dessert plate. Add a quenelle (oval scoop) of vanilla ice cream to one side. Drizzle dark chocolate sauce in an artistic arc across the plate. Scatter crushed praline pieces strategically ; not randomly. Dust the plate rim with cocoa powder using a fine-mesh strainer.
For special occasions, serve on warmed plates to slow the cooling process. Add a sprig of fresh mint for color contrast. The first cut should reveal the flowing center – do this at the table for maximum impact.
Complementary Pairings
Beverages:
- Espresso or dark-roast coffee to cut the richness
- Sparkling grape juice or pomegranate juice
- Hot chocolate with a touch of hazelnut syrup
- Chai tea latte with warming spices
Ice Cream and Cream Accompaniments:
- Classic vanilla bean for contrast
- Salted caramel for flavor echo
- Coffee ice cream for sophisticated pairing
- Brown butter ice cream for nutty resonance
- Cinnamon whipped cream for added warmth
Sauce Options:
- Caramel sauce with fleur de sel
- Vanilla crème anglaise
- Dark chocolate ganache (for chocolate lovers)
- Raspberry coulis for fruity brightness
Storage Tips and Leftover Magic
While these gluten free dessert recipes are best served immediately, life happens. If you have unbaked batter, refrigerate in ramekins tightly covered for up to 24 hours. Already baked cakes can be stored in the refrigerator for up to 2 days, though reheating won’t restore the molten center ; they’ll be more like flourless chocolate cakes (still delicious, just different). These gluten free desserts recipes keep their flavor beautifully even when stored.
For reheating baked cakes, microwave for 15-20 seconds until just warm, or place in a 350°F oven for 5-6 minutes. The center won’t be molten anymore, but the flavor remains excellent.
Leftover praline is never a problem – sprinkle over ice cream, fold into brownies, crush and add to cookie dough, or simply snack on pieces with coffee.
FAQ: Your Recipe Questions Answered
Can I make these in different sizes? Yes! Use 4-ounce ramekins for smaller portions (reduce baking time to 9-10 minutes) or make one large cake in an 8-inch round pan (increase time to 16-18 minutes, though you lose the molten effect).
What if I don’t have ramekins? Muffin tins work in a pinch. Use a generous amount of butter and sugar to coat, fill only 3/4 full, and reduce baking time to 9-10 minutes.
Can I make this without the praline center? Absolutely, though you’ll miss the special touch. For a simpler version, add a square of chocolate or a spoonful of Nutella to the center instead.
How can I tell if my almond flour is still fresh? Fresh almond flour should smell sweet and nutty, never rancid or bitter. Store in the refrigerator or freezer to extend shelf life.
Why did my cakes deflate after unmolding? This usually means they were slightly underbaked. The structure needs those final 1-2 minutes to set. Next time, bake 1 minute longer.
Can I use a different type of nut flour? Hazelnut flour would be amazing and complement the praline. Avoid coconut flour – it absorbs liquid differently and won’t work in this recipe.
Do I really need the espresso powder? No, but it intensifies the chocolate flavor without adding a coffee taste. If you skip it, add an extra 1/4 teaspoon of vanilla extract.
Ready to create these show-stopping molten praline cakes that will have everyone asking for the recipe? These simple gluten free desserts prove that gluten-free doesn’t mean compromise ; it means delicious innovation!
Leave a Review
There are no reviews yet. Be the first one to write one.