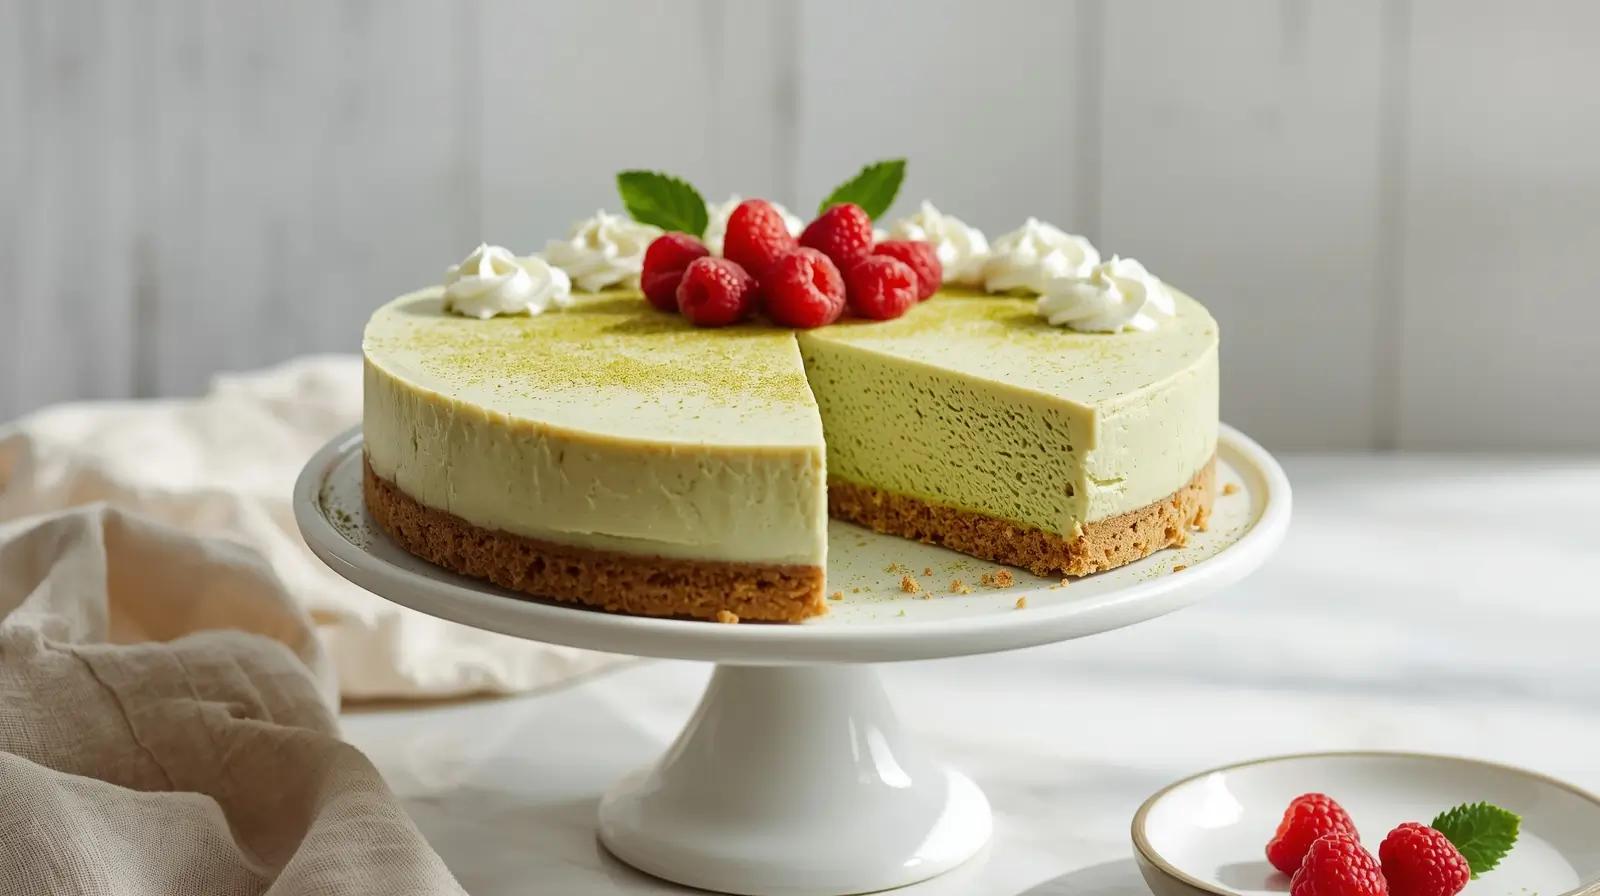
No Bake Matcha Cheesecake – Silky, Creamy and Easy
There’s something almost magical about slicing into a no bake matcha cheesecake – that first glimpse of vibrant green against the golden cookie crust, the way your fork glides through like you’re cutting through clouds. I’ll never forget the first time I made this no bake matcha cheesecake for a friend’s birthday. She took one bite, closed her eyes, and said it tasted like “spring in cake form.” Honestly? She wasn’t wrong.
This green tea cheesecake has become my secret weapon whenever I need to impress without actually turning on the oven (because who wants to heat up the kitchen in summer?). The earthy, slightly bitter notes of ceremonial-grade matcha powder balance perfectly with the creamy, tangy cheesecake filling. It’s sophisticated without being fussy, and this no bake matcha cheesecake method means you can make it even when your oven is broken – trust me, I’ve been there.
Table of Contents
After the step-by-step recipe, you’ll find detailed tips, flavor variations, and everything you need to master this stunning matcha green tea dessert recipe.
Recipe Overview
| Prep Time | Chill Time | Total Time | Servings |
|---|---|---|---|
| 25 mins | 6 hours | 6 hours 25 mins | 10-12 slices |
Ingredients
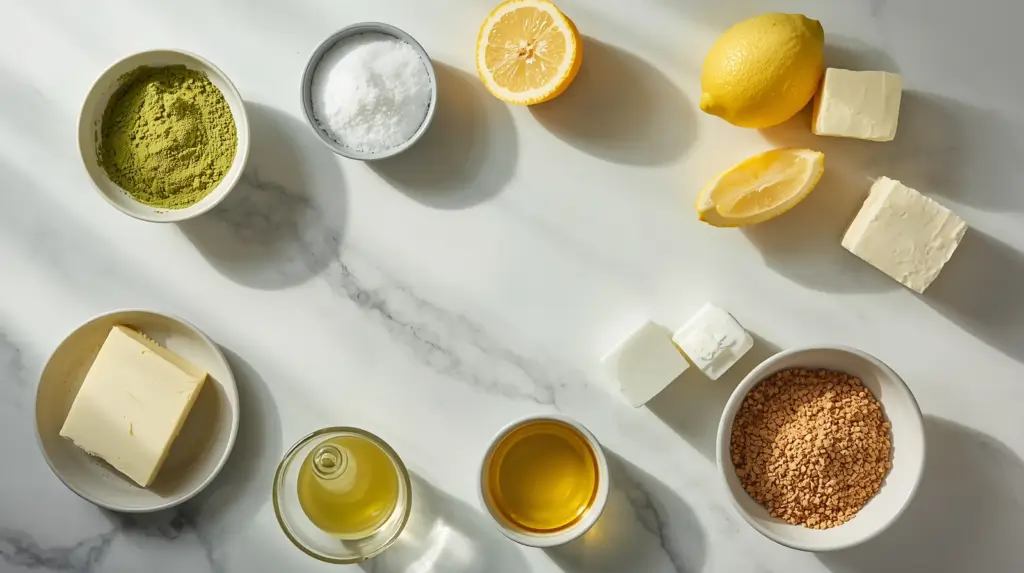
For the Cookie Crust:
- 2 cups graham cracker crumbs (or digestive biscuits, finely crushed)
- 1/4 cup granulated sugar
- 1/2 cup unsalted butter, melted
- Pinch of salt
For the Matcha Cheesecake Filling:
- 24 oz (680g) cream cheese, softened to room temperature
- 3/4 cup granulated sugar
- 3 tablespoons ceremonial-grade matcha powder (culinary grade works too)
- 1 1/4 cups heavy whipping cream, cold
- 2 teaspoons pure vanilla extract
- 1/4 cup hot water (for dissolving matcha)
- 2 tablespoons fresh lemon juice
- 1/4 teaspoon salt
For Topping & Garnish:
- 1/2 cup heavy cream, whipped
- 1 teaspoon matcha powder (for dusting)
- White chocolate shavings (optional)
- Fresh berries (strawberries or raspberries work beautifully)
Recipe Variations & Adaptations
- Crust Options: Swap graham crackers for Oreos (cream removed), vanilla wafers, or even shortbread cookies for different flavor profiles.
- Sweetness Level: Reduce sugar to 1/2 cup if you prefer the earthy matcha flavor more pronounced, or add 2 tablespoons honey for deeper sweetness.
- Matcha Intensity: Start with 2 tablespoons matcha for subtle flavor, go up to 4 tablespoons if you’re a serious green tea enthusiast.
- Mini Cheesecakes: Divide mixture into muffin tins lined with paper cups for individual portions – perfect for parties.
- Vegan Version: Use vegan cream cheese and coconut cream (chilled overnight), though texture will be slightly less firm.
- Chocolate Swirl: Marble in 1/4 cup melted white chocolate for a beautiful contrast.
Timing & Temperature Guide
Planning and Timing
This no bake matcha cheesecake needs patience more than skill. The 6-hour minimum chill time isn’t negotiable – it’s what transforms your mixture from soup into that sliceable, creamy perfection. I usually make mine the night before serving, which also lets the flavors marry and develop into something even more spectacular.
Optimal Temperature Requirements
Every ingredient matters when you’re not relying on heat to set things up. Your cream cheese should sit at room temperature for at least an hour before starting – cold cream cheese creates lumps that no amount of beating will smooth out. The heavy cream, on the other hand, needs to be properly cold (straight from the fridge) to whip up into those stiff peaks that give this no bake matcha cheesecake its airy texture.
Preparation Timeline Table
| Phase | Temperature | Duration |
|---|---|---|
| Cream Cheese Softening | 68-70°F (20-21°C) | 1-2 hours |
| Crust Preparation | Room temperature | 10 minutes |
| Crust Chilling | 35-40°F (2-4°C) | 30 minutes |
| Filling Preparation | Cool room temp | 15 minutes |
| Initial Refrigeration | 35-40°F (2-4°C) | 4 hours minimum |
| Final Set | 35-40°F (2-4°C) | 2-6 hours |
| Best Serving Temp | 45-50°F (7-10°C) | Let sit 10 mins before serving |
Step-by-Step Instructions: From Prep to Perfection
Building Your Crust Foundation
Crust Creation:
- Grab your food processor or a zip-lock bag and rolling pin – crush those graham crackers until they look like wet sand. No big chunks allowed here.
- Mix the crumbs with sugar and that pinch of salt in a medium bowl.
- Pour in the melted butter and stir with a fork until everything looks like damp sand. You should be able to squeeze it and have it hold together.
- Firmly press the mixture into the base of a 9-inch springform pan. Use the bottom of a measuring cup to really pack it down – you want a solid base that won’t crumble when you slice it later.
- Pop it in the fridge for 30 minutes while you make the filling. This helps it firm up and stay put.
Creating the Dreamy Matcha Filling
Matcha Preparation (This Step is Crucial):
- Sift your matcha powder into a small bowl – yes, even if it looks lump-free. Matcha is stubborn and hides clumps.
- Add 1/4 cup of hot (not boiling) water and whisk vigorously until you’ve got a smooth, bright green paste. This step prevents those disappointing green specks in your final cheesecake.
- Let it cool to room temperature while you prep the rest.
Cream Cheese Base:
- In a large bowl, beat the softened cream cheese with an electric mixer on medium speed for about 2 minutes. It should look fluffy and smooth – like expensive face cream.
- Gradually add the sugar, beating until completely incorporated. Scrape down the sides of the bowl.
- Pour in your cooled matcha mixture, vanilla extract, lemon juice, and salt. Beat until the color is uniform and vibrant – this is where the magic happens and your mixture turns that gorgeous green.
Whipping and Folding:
- In a separate cold bowl, whip the heavy cream until stiff peaks form. When you lift the beaters, the peaks should stand up proudly without drooping.
- Here’s where gentle hands matter: fold about one-third of the whipped cream into the matcha-cream cheese mixture to lighten it. Use a rubber spatula and cut through the center, then sweep along the bottom and up the side.
- Add the remaining whipped cream and fold gently until just combined. A few white streaks are fine – overmixing will deflate all that beautiful airiness you just created.
Assembly and Setting
Bringing It Together:
- Pour the matcha filling over your chilled crust. Spread the mixture evenly to the edges using an offset spatula.
- Gently tap the pan on the counter a few times to remove any trapped air bubbles.
- Cover the top loosely with plastic wrap (don’t let it touch the surface).
- Refrigerate for at least 6 hours, but overnight is even better. I know waiting is hard, but this is what separates a good cheesecake from a great one.
Final Touches Before Serving:
- Run a thin knife around the edge of the pan before releasing the springform – this prevents cracking.
- Dust the top with a light layer of matcha powder using a fine-mesh sieve.
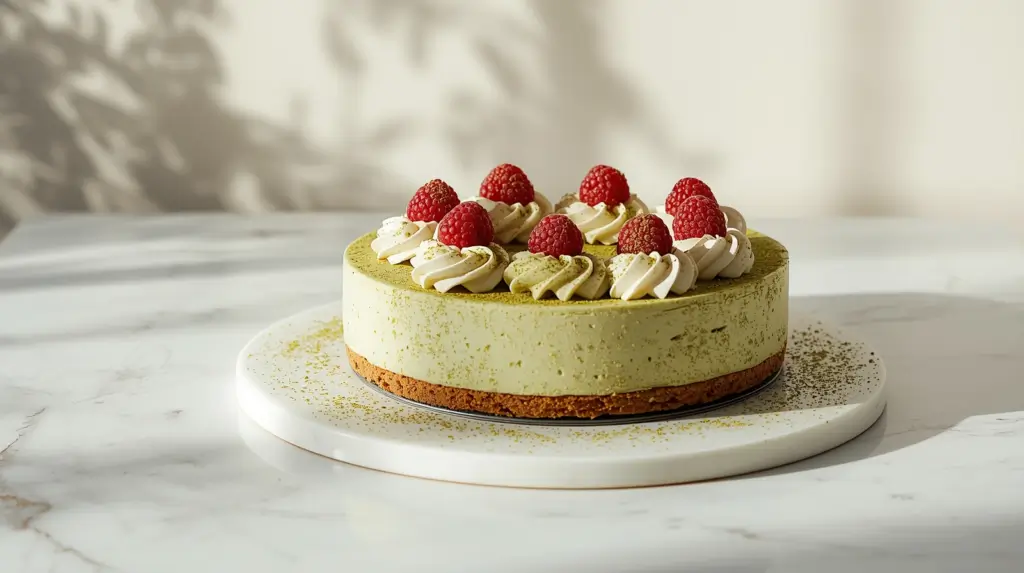
- Add dollops of whipped cream around the edge, scatter some fresh berries, and if you’re feeling fancy, those white chocolate shavings add a nice textural contrast.
- Let the cheesecake sit at room temperature for about 10 minutes before slicing – it makes cutting cleaner and enhances the creamy texture.
Love this recipe? Discover 4 more easy matcha recipes to try here!
Want to discover the tips, creative twists, and presentation secrets behind this stunning matcha dessert? Keep reading!
The Magic Behind This Easy Matcha Dessert
Here’s the thing about this no bake matcha cheesecake – it looks like you spent hours in the kitchen when really, most of the work is just waiting. The combination of tangy cream cheese and earthy matcha creates this complex flavor profile that keeps people guessing. Some taste the cream cheese first, others get hit with the matcha immediately. Either way, they always come back for seconds.
Understanding the No-Bake Science
Traditional cheesecakes rely on eggs and oven heat to set the filling. This no bake matcha cheesecake takes a different path. The whipped cream provides structure through tiny air bubbles that get trapped in the cream cheese matrix. As it chills, the fat molecules in both the cream cheese and whipped cream solidify just enough to create that signature sliceable texture without any baking required. The result? A lighter, mousse-like consistency that melts on your tongue instead of sitting heavy in your stomach.
Why Temperature Matters More Than You Think
I learned this lesson the hard way when I once tried to rush by using cold cream cheese. The filling looked curdled and lumpy, no matter how long I beat it. Room temperature cream cheese is soft enough to beat smooth but still stable enough to hold the structure. Cold heavy cream, on the other hand, whips up with more volume and stability. It’s all about respecting what each ingredient needs to do its job properly.
Flavor Evolution: From Bowl to Plate
| Aspect | Fresh from Mixing | After 6 Hours | After 24 Hours |
|---|---|---|---|
| Texture | Soft, mousse-like | Firm, sliceable | Perfect density |
| Matcha Flavor | Bright, grassy | Balanced, mellow | Deep, harmonious |
| Sweetness | Pronounced | Well-integrated | Complex, layered |
| Color | Vibrant green | Rich jade | Deeper emerald |
| Cream Cheese Tang | Sharp, distinct | Rounded, smooth | Beautifully balanced |
Selecting Quality Ingredients for Superior Results
The difference between an okay matcha mousse cake and an extraordinary no bake matcha cheesecake often comes down to ingredient quality. Let me break down what actually matters.
- Matcha Quality: Ceremonial-grade matcha produces that brilliant green color and smooth, non-bitter taste. Culinary-grade works fine and costs less, but the color will be more olive and the flavor slightly more astringent. Whatever you choose, buy from a reputable source – bad matcha tastes like grass clippings and turns brownish-green. Fresh matcha should smell sweet and vegetal, like fresh-cut grass after rain.
- Cream Cheese: Full-fat brick-style cream cheese is non-negotiable. The spreadable tub stuff contains stabilizers that prevent proper whipping and create a denser, less smooth texture. Philadelphia is reliable, but store brands work perfectly fine if they’re full-fat.
- Heavy Cream: Look for cream with at least 36% fat content. Ultra-pasteurized cream is fine, though fresh cream whips slightly better if you can find it. Avoid “whipping cream” or anything with additives – you want pure, simple heavy cream.
- Graham Crackers: The honey variety adds a nice subtle sweetness, but regular works great too. Just make sure they’re fresh – stale crackers make for a stale-tasting crust.
Make-Ahead Strategy
The beauty of this no bake matcha cheesecake is its make-ahead friendliness. You can prepare the crust up to 3 days in advance and keep it covered in the fridge. The complete cheesecake actually improves with time – make it 1-2 days before serving for the best texture and flavor development. Just add the garnishes right before serving to keep everything looking fresh.
Insider Secrets for Professional-Looking Results
These are the tricks that took me several attempts (and a few disasters) to figure out.
Common Mistakes That Ruin Everything
- The Lumpy Disaster: Adding matcha powder directly to cream cheese without dissolving it first creates an unpleasant, gritty texture with concentrated bitter spots in your no bake matcha cheesecake. Always make that smooth matcha paste first.
- The Deflation Problem: Overmixing after adding whipped cream knocks out all the air bubbles that give the cheesecake its light texture. Fold gently until you barely see white streaks, then stop. It’ll smooth out as it sets.
- The Weepy Crust: Not pressing the crust firmly enough creates gaps where filling can seep underneath. Use real pressure with that measuring cup – you want it packed tight.
- The Color Confusion: Using old, oxidized matcha results in a murky brown-green color instead of that gorgeous jade. Matcha loses vibrancy within months of opening, so store it in the freezer and buy small quantities.
Advanced Techniques for Next-Level Results
The Double-Strain Method: After making your matcha paste, press it through a fine-mesh sieve to catch any remaining clumps. This extra 30 seconds creates the silkiest filling imaginable.
Temperature Staging: Instead of refrigerating immediately, let the assembled cheesecake sit at room temperature for 30 minutes first. This prevents condensation from forming on the surface and allows the filling to settle more evenly before the cold hits.
The Clean Slice Trick: Heat your knife under hot water, dry it completely, then make your cut. Wipe the blade clean between each slice and reheat as needed. This creates those Instagram-worthy clean edges instead of messy, dragged filling.
Creative Twists on the Classic
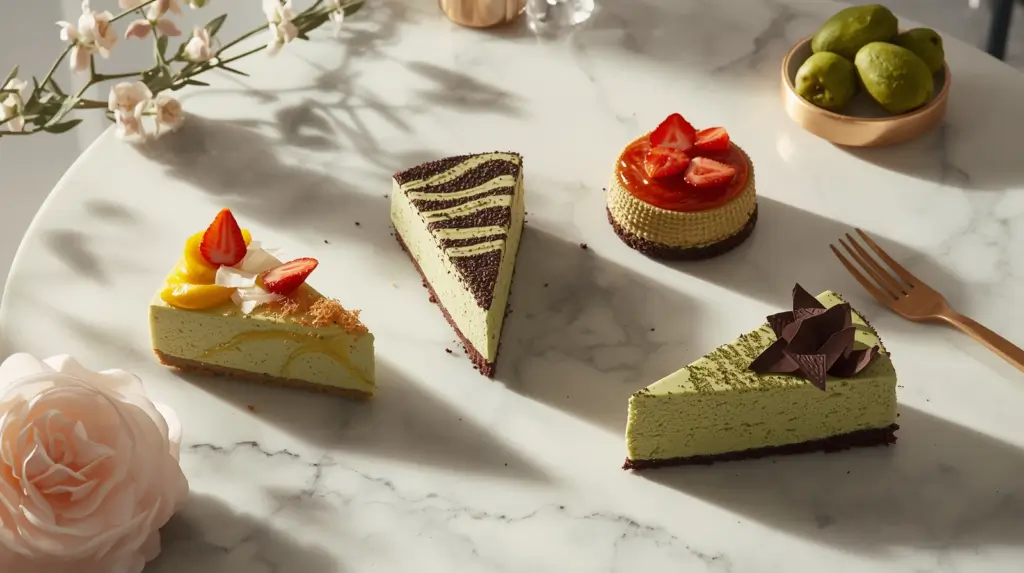
Flavor Adventures Beyond Traditional
These creative twists elevate your dessert with matcha, from tropical coconut to black sesame fusion.
Tropical Matcha Dream: Add 1/4 cup coconut cream to the filling and press toasted coconut flakes into the crust. Top with fresh mango slices and a drizzle of passion fruit syrup. The tropical notes surprisingly complement matcha’s earthiness.
Black Sesame Fusion: Mix 2 tablespoons black sesame paste into half the filling and create a marble effect. Use a black sesame crust for full commitment to the flavor profile. This Asian-inspired combination is subtly nutty and visually stunning.
Strawberry Matcha Garden: Create a strawberry compote layer between the crust and matcha filling. The sweet-tart berries cut through the richness while adding a beautiful color contrast when you slice into it.
Chocolate Lover’s Matcha: Use chocolate cookie crust (Oreos with cream scraped out) and add 1/4 cup melted white chocolate to the filling. Garnish with dark chocolate shavings for a sophisticated dessert that bridges Japanese tea ceremony and European café culture.
Presentation That Stops Scrolling
Plating for Maximum Impact
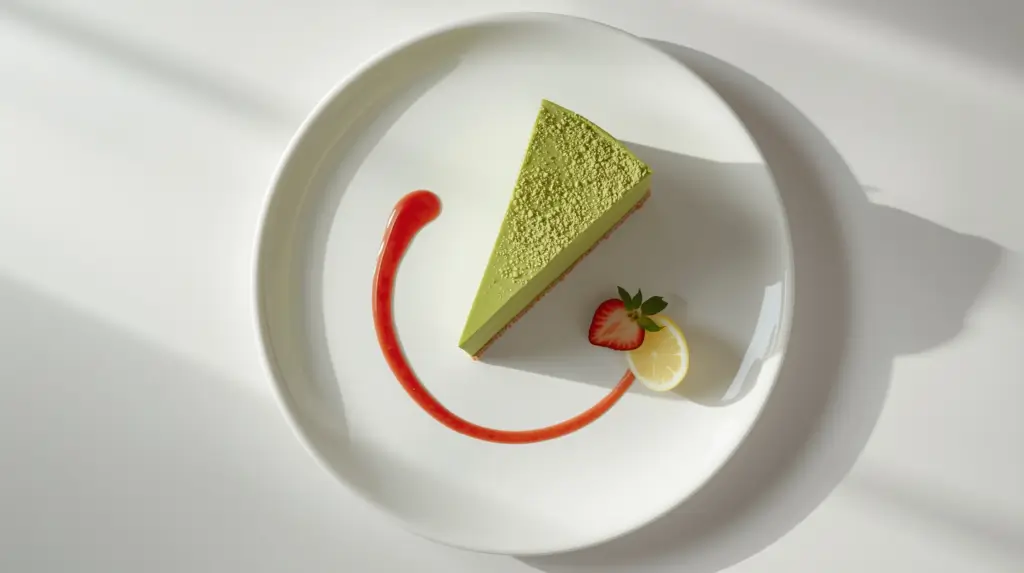
The visual appeal of this green tea cheesecake is half its charm. Slice with a hot, clean knife to reveal that sharp edge between the golden crust and vibrant green filling. Place each slice slightly off-center on a white plate – asymmetry looks more intentional and modern.
Create a simple sauce accent by blending fresh strawberries with a splash of lemon juice, then drag a spoon through it across the plate. Place your cheesecake slice on top and dust with matcha powder at the last second (it oxidizes quickly and can turn brownish if left too long).
For casual gatherings, keep it simple: serve the whole cheesecake on a cake stand, dust the top with matcha, and arrange fresh berries in the center. Let people admire it before you slice. There’s something satisfying about that moment when everyone leans in to look.
Perfect Companions and Beverage Pairings
Tea Service:
- Hot sencha or genmaicha for traditional pairing
- Iced hojicha for a roasted, smoky contrast
- Jasmine green tea for floral notes
- Cold brew coffee for the bold
Fresh Elements:
- Macerated strawberries with a touch of balsamic
- Fresh raspberries with mint leaves
- Sliced kiwi for color and tartness
- Candied citrus peel for sophistication
Textural Additions:
- Crispy matcha cookies on the side
- Candied ginger for spicy sweetness
- Toasted pistachios, roughly chopped
- Mochi pieces for chewy contrast
Beverage Pairings:
- Sparkling rosé (yes, really – the bubbles and fruit notes work beautifully)
- Sake, particularly a fruity ginjo style
- Sparkling water with yuzu
- Cold matcha latte for the matcha-obsessed
Making It Last (And Taste Great Later)
Storage Wisdom
Cover your no bake matcha cheesecake tightly with plastic wrap or keep it in the springform pan with the rim still attached and wrapped. It stays perfect in the refrigerator for up to 5 days, though the crust gradually softens as moisture migrates. Honestly, in my house, it never lasts more than 3 days anyway.
Freezing works surprisingly well for up to 2 months. Wrap individual slices tightly in plastic wrap, then aluminum foil. Thaw overnight in the refrigerator – never at room temperature, which creates condensation and makes the texture weepy. The crust loses some crispness after freezing, but the filling maintains its creamy texture beautifully.
Reviving Leftovers: If your cheesecake has been sitting for a few days and the top looks a bit dry, dust it with fresh matcha powder or spread a thin layer of whipped cream on top. It’ll look fresh again and add an extra creamy element.
Signs It’s Past Its Prime: Discard if you see any mold (obviously), if it smells sour instead of tangy-sweet, or if the texture becomes slimy. Properly stored, these issues are rare, but cream cheese is perishable, so use your judgment.
Your Questions Answered (Because I’ve Heard Them All)
Can I make this matcha cheesecake recipe without a springform pan?
You can use a regular cake pan lined with parchment paper with long overhangs that act as handles to lift the whole thing out. Or go with a pie dish and serve it in wedges directly from the pan – it won’t look as polished, but your no bake matcha cheesecake will taste the same. I’ve even made this in a square baking dish and cut it into bars for parties.
Why is my matcha cheesecake without oven not setting properly?
Usually, this means your heavy cream wasn’t whipped to stiff peaks or you overmixed and deflated the air bubbles. It could also mean you didn’t chill it long enough – some refrigerators run warmer than others, so you might need 8 hours instead of 6. If it’s been 12 hours and still soft, pop it in the freezer for an hour to firm it up.
How do I prevent that bitter matcha aftertaste?
Use high-quality ceremonial-grade matcha and don’t exceed 3 tablespoons unless you really love bold, bitter flavors. The lemon juice and sugar in this recipe are carefully balanced to mellow matcha’s natural astringency. Also, make sure your matcha is fresh – old matcha tastes increasingly bitter and loses its natural sweetness.
Can I use Greek yogurt instead of cream cheese for a lighter version?
I’ve tried this, and while it works, the texture becomes more like a mousse than a cheesecake. Use full-fat Greek yogurt and add 2 tablespoons of gelatin bloomed in cold water to help it set. The flavor is tangier and less rich, which some people actually prefer.
What’s the difference between culinary and ceremonial-grade matcha for this recipe?
Ceremonial grade is stone-ground from the youngest tea leaves, creating a vibrant green color, smooth texture, and naturally sweet, umami-rich flavor. Culinary grade uses slightly older leaves, has a more olive color, and tastes more astringent. For desserts, culinary grade is perfectly fine and costs less. Save the expensive ceremonial grade for drinking.
My cheesecake cracked on top – did I ruin it?
Cheesecakes crack when they cool too quickly or when they’re overbaked (not an issue here) or when you remove the springform ring too soon. Since this is no-bake, cracks usually come from temperature shock. If it happens, cover it with whipped cream, dust with matcha, or arrange berries strategically. Nobody will know.
Can I prepare individual portions instead of a single large cheesecake?
Absolutely! Use muffin tins lined with paper cups or small mason jars. Press about 2 tablespoons of crust mixture into each, then divide the filling evenly. They’ll need less time to set – about 4 hours instead of 6. These are great for parties and portion control.
How far in advance can I make this for a special occasion?
Make it 2 days ahead for optimal texture and flavor. Don’t add garnishes until a few hours before serving. If you’re making it more than 2 days ahead, freeze it after it’s fully set, then thaw in the refrigerator 24 hours before serving. Add fresh garnishes right before bringing it out.
Ready to create this stunning easy matcha dessert that’ll have everyone asking for the recipe? The best part is watching people’s faces when they take that first bite – that moment when they realize something can be both refreshing and indulgent at the same time. Grab your ingredients and let’s make some magic happen.
Leave a Review
Have you tried this no bake matcha cheesecake? I’d love to hear how it turned out! Drop a comment below with your experience, any tweaks you made, or questions you have. Your feedback helps other bakers and keeps me inspired to create more recipes.
Leave a Review
There are no reviews yet. Be the first one to write one.