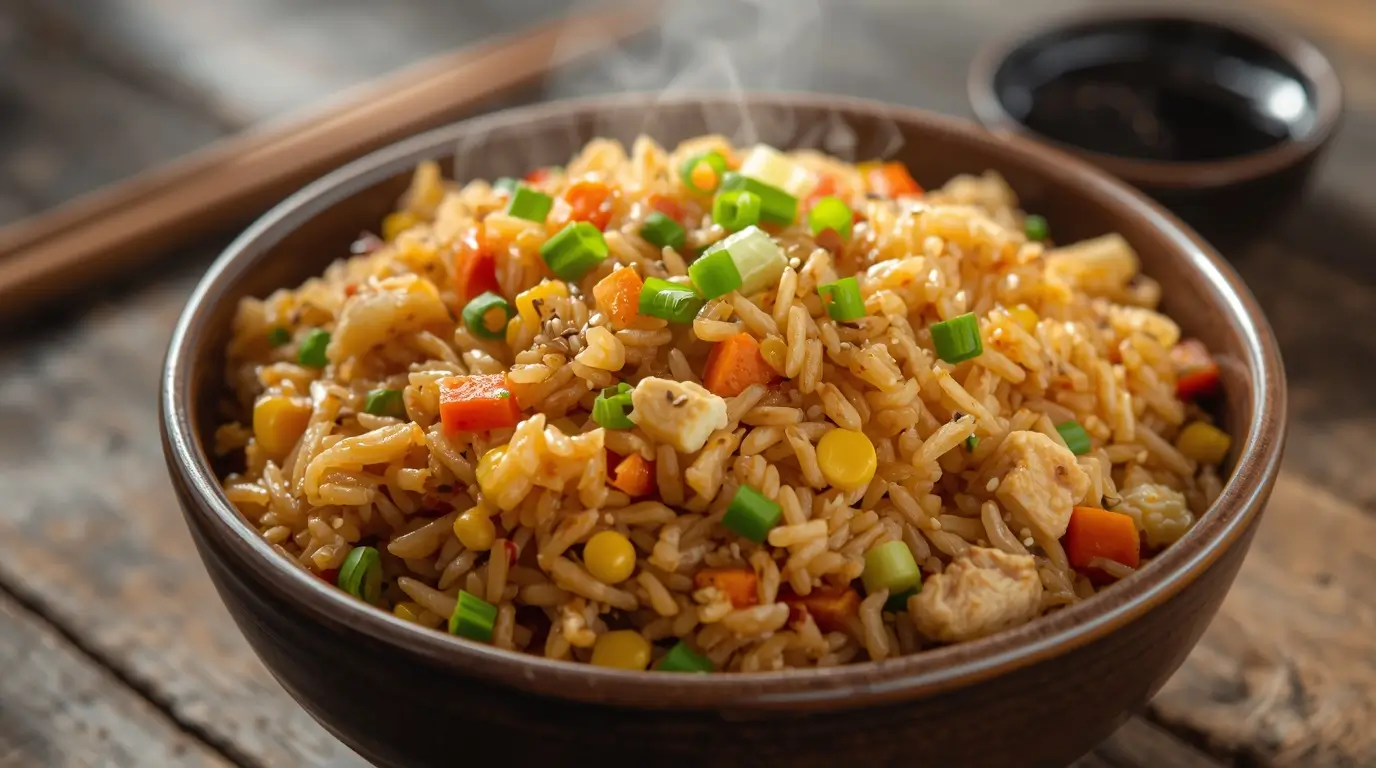
How to Make a Foolproof Fried Rice Recipe Every Time
When you’re craving that signature golden, slightly crispy texture of authentic Chinese fried rice but don’t want to wait for delivery, this homemade fried rice recipe delivers everything you love about restaurant versions – with ingredients you probably already have in your kitchen. Mastering how to make fried rice opens up endless weeknight possibilities, and the carefully balanced combination of day-old rice, high heat cooking, and proper seasoning creates that elusive “wok hei” (breath of the wok) flavor that separates forgettable attempts from the real deal.
The most common mistake that ruins homemade fried rice? Using freshly cooked rice. Professional chefs at Chinese restaurants know the secret: day-old refrigerated rice is essential for achieving that perfect texture. This single tip transforms soggy, clumpy disasters into restaurant-quality Chinese rice with distinct, slightly crispy grains. Once you understand this fundamental principle, this fried rice recipe becomes a reliable twice-weekly solution for turning random fridge leftovers into a craveable dinner.
Table of Contents
After the step-by-step recipe, dive into enriched content full of tips, tricks, and variations to elevate your dish.
Recipe Overview
| Prep Time: | Cook Time: | Total Time: | Servings: |
|---|---|---|---|
| 15 mins | 12 mins | 27 mins | 4-6 |
Note: This assumes you already have day-old rice. If starting from scratch, add 45 minutes for cooking and cooling rice.
Ingredients
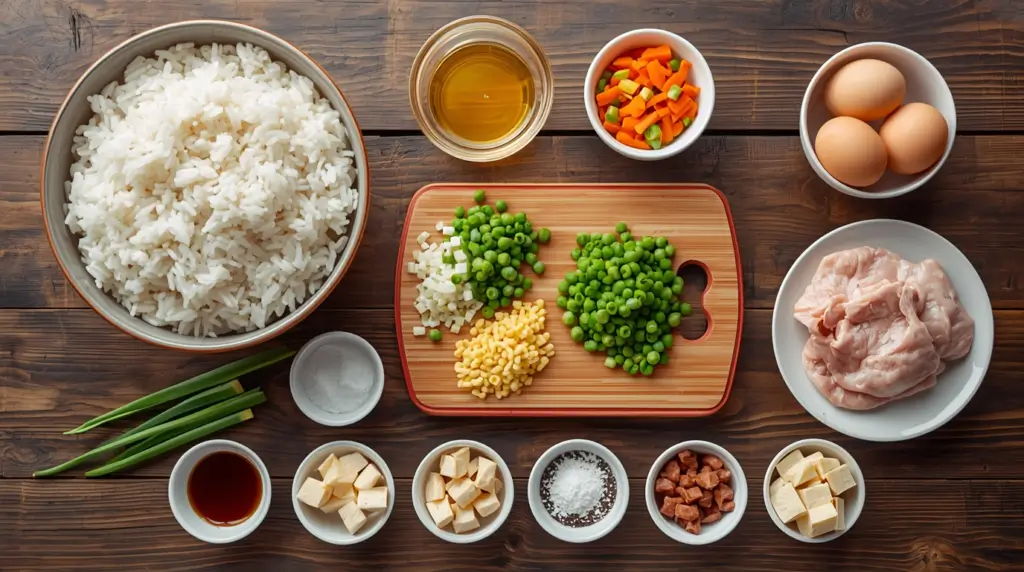
For the Base Chinese Fried Rice:
- 4 cups cooked white rice, refrigerated overnight (preferably jasmine or long-grain)
- 3 large eggs, lightly beaten
- 3 tablespoons vegetable oil, divided
- 1 cup mixed vegetables (peas, carrots, corn – fresh or frozen)
- 3 green onions, white and green parts separated, thinly sliced
- 3 cloves garlic, minced
- 1 tablespoon fresh ginger, minced
Protein Options (choose one or mix):
- 1 cup cooked chicken, diced
- 1 cup cooked shrimp, chopped
- 1 cup cooked beef, diced
- 1 cup firm tofu, cubed and pan-fried
- 1 cup cooked turkey, diced
For the Seasoning Blend:
- 3 tablespoons soy sauce (use low-sodium for better control)
- 1 tablespoon oyster sauce
- 2 teaspoons sesame oil
- 1 teaspoon sugar
- 1/2 teaspoon white pepper
- 1/4 teaspoon MSG (optional but authentic)
For Serving:
- Additional sliced green onions
- Sesame seeds
- Fried shallots (optional)
- Chili oil or sriracha
Recipe Variations & Adaptations
- Spice Level Adjustments: Add 1-2 teaspoons chili garlic sauce or fresh sliced chilies for heat lovers.
- Gluten-Free Option: Replace soy sauce with tamari or coconut aminos for a gluten-free Chinese rice version.
- Low-Sodium Alternative: Use reduced-sodium soy sauce and skip added salt, relying on oyster sauce for depth.
- Protein Variations: This fried rice recipe works with any protein – leftover steak, rotisserie chicken, or even canned tuna.
- Vegetarian Version: Skip meat entirely and add extra vegetables like mushrooms, bell peppers, and edamame.
- Pineapple Fried Rice: Add 1 cup fresh pineapple chunks and 1/2 teaspoon curry powder for Thai-inspired flavors.
- Kimchi Fried Rice: Substitute 1 cup chopped kimchi for some vegetables and add a fried egg on top.
Timing & Temperature Guide
Planning and Timing
The secret to exceptional homemade fried rice starts the day before. Freshly cooked rice contains too much moisture and will turn mushy when stir-fried. Day-old refrigerated rice has the perfect texture – the grains separate easily and develop that signature slightly chewy exterior when hit with high heat.
Optimal Temperature and Texture Requirements
The key to restaurant-quality Chinese fried rice lies in maintaining screaming hot temperatures throughout cooking. Your pan or wok should be so hot that ingredients sizzle immediately upon contact. This high heat creates the subtle smokiness called “wok hei” that separates amateur attempts from professional results.
Preparation Timeline Table
| Phase | Temperature | Duration |
|---|---|---|
| Rice Cooking (if needed) | 212°F (100°C) | 15-20 minutes |
| Rice Cooling & Drying | 38°F (3°C) refrigerated | 8-24 hours |
| Ingredient Prep | Room temperature | 15 minutes |
| Wok/Pan Heating | 450-500°F (232-260°C) | 3-5 minutes |
| Egg Cooking | High heat | 1-2 minutes |
| Vegetable Stir-fry | High heat | 2-3 minutes |
| Rice Stir-fry | High heat | 4-5 minutes |
| Final Mixing | High heat | 1-2 minutes |
Step-by-Step Instructions: From Prep to Plate
Preparing Your Rice Foundation
Rice Selection and Preparation:
- If cooking rice fresh, use 1½ cups uncooked long-grain white rice with 2¼ cups water
- Cook until tender but not mushy, then spread on a baking sheet to cool quickly
- Chill uncovered for at least 4 hours, or ideally overnight.
- Before cooking, break up any clumps with your hands – each grain should separate easily
- Cold rice is essential for this fried rice recipe to achieve proper texture
Ingredient Organization (Mise en Place):
- Crack eggs into a bowl and beat lightly with a pinch of salt
- Dice all proteins into uniform ½-inch pieces
- Mince garlic and ginger finely – they’ll cook in seconds
- Slice green onion whites and greens separately
- Measure all sauces and have them ready in small bowls
- Make sure everything is within easy reach before you begin cooking.
Cooking Process: How to Make Fried Rice Like a Pro
Creating the Egg Base:
- Heat wok or large skillet over high heat until smoking
- Add 1 tablespoon vegetable oil and swirl to coat
- Pour in beaten eggs and let sit for 10 seconds without stirring
- Scramble quickly into large, fluffy curds – they should be slightly underdone
- Remove eggs to a plate immediately and set aside
Building Flavor Layers:
- Add 1 tablespoon oil to the same hot pan
- Toss in white parts of green onions, garlic, and ginger
- Stir-fry for 30 seconds until fragrant but not browned
- Add your chosen protein and stir-fry for 2 minutes until heated through
- Push everything to the sides, creating a well in the center
The Critical Rice Stage:
- Add final tablespoon of oil to the center well
- Add cold rice, breaking up any remaining clumps
- Press rice against the hot pan surface and let it sit for 30 seconds
- Toss and repeat this press-and-rest technique 3-4 times
- This creates those coveted golden, slightly crispy bits
- Continue stir-frying for 4-5 minutes until rice is heated through and slightly toasted
Final Assembly for Perfect Chinese Fried Rice:
- Drizzle soy sauce and oyster sauce around the edges of the pan (not directly on rice)
- Toss everything together rapidly to distribute seasonings evenly
- Add sugar and white pepper, mixing thoroughly
- Return scrambled eggs to the pan, breaking into smaller pieces as you toss
- Add vegetables and green onion greens, stir-frying for 1-2 minutes
- Drizzle sesame oil around the edge and give one final toss
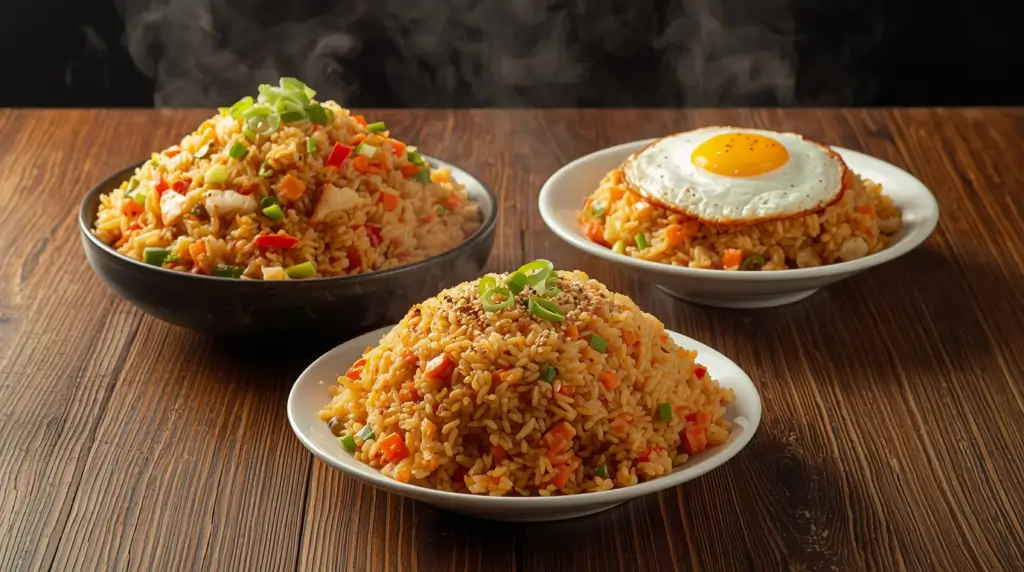
Final Presentation & Plating
Plating and Garnishing:
- Transfer immediately to a large serving platter or individual bowls
- The rice should be steaming and have visible golden bits throughout
- Garnish with additional sliced green onions and sesame seeds
- Serve with chili oil or sriracha on the side for heat lovers
Serving Suggestions:
- Pile high in bowls for casual family-style dining
- Pack into small bowls, then invert onto plates for restaurant presentation
- Top with a sunny-side-up egg for breakfast fried rice
- Serve immediately while piping hot – fried rice waits for no one
Nutritional Benefits Meet Incredible Flavor
This homemade fried rice isn’t just delicious – it’s a balanced meal that provides complex carbohydrates, quality protein, and essential vegetables in one satisfying dish. When made with brown rice instead of white, fiber content increases significantly while maintaining the authentic texture and flavor.
The eggs provide complete protein and essential amino acids, while the vegetables contribute vitamins A and C, plus beneficial antioxidants. Using minimal oil and controlling sodium levels makes this fried rice recipe a healthier alternative to restaurant versions, which often contain excessive amounts of both.
| Nutrient | Amount per Serving (1½ cups) |
|---|---|
| Calories | 385 |
| Total Fat | 14g |
| Saturated Fat | 2.5g |
| Cholesterol | 140mg |
| Sodium | 680mg |
| Total Carbohydrates | 48g |
| Dietary Fiber | 2g |
| Sugars | 3g |
| Protein | 16g |
| Vitamin A | 20% DV |
| Vitamin C | 15% DV |
| Iron | 10% DV |
Nutritional values based on recipe with chicken protein and standard vegetables
Curious to discover the story, secrets, and tips behind this recipe? Read on!
Why This Recipe Will Become Your Favorite
- Transforms yesterday’s plain rice into today’s dinner hero with minimal effort
- Costs less than $3 per serving compared to $10+ restaurant orders
- Ready in under 30 minutes once you have the day-old rice prepared
- Infinitely customizable based on what’s in your fridge – no two batches need to be the same
- High heat technique creates authentic restaurant flavor you can’t achieve any other way
- Perfect vehicle for using up small amounts of leftover proteins and vegetables
- Kids actually get excited about eating vegetables when they’re mixed into fried rice
The Secret Behind Restaurant-Quality Results
What separates mediocre homemade fried rice from restaurant-quality Chinese fried rice isn’t exotic ingredients – it’s understanding three key principles. First, day-old rice loses surface moisture and firms up, allowing individual grains to crisp rather than clump. Second, extreme heat triggers the Maillard reaction, creating that smoky “wok hei” flavor. Third, proper technique means cooking components separately before combining, ensuring each element achieves perfect texture.
This is why you can’t make proper fried rice in a non-stick pan over medium heat – you need serious BTUs to trigger these chemical transformations that create complex flavor.
| Feature | Basic Rice Dish | Restaurant-Quality Fried Rice |
|---|---|---|
| Rice Texture | Soft, sticky, clumpy | Individual grains with slight crisp |
| Flavor Complexity | One-dimensional, bland | Layered umami with subtle smokiness |
| Appearance | Pale white, uniform | Golden with visible charred bits |
| Cooking Method | Mixed in pan | Carefully sequenced high-heat technique |
| Versatility | Side dish only | Complete meal or impressive side |
| Cost per Serving | $1.50-2.00 | $0.75-1.50 |
Choosing the Best Ingredients for Maximum Flavor
Creating exceptional homemade fried rice starts with smart ingredient choices. Day-old jasmine or long-grain rice offers the perfect texture – avoid freshly cooked rice at all costs. Quality soy sauce (Japanese or Chinese brands) makes a huge difference over supermarket generics. Oyster sauce adds irreplaceable umami depth, while toasted sesame oil should only be used for finishing, never cooking, as it burns easily.
White pepper creates authentic flavor without visible specks, and MSG (optional) enhances flavors naturally. For maximum convenience, cook rice up to 3 days ahead, prep vegetables and proteins the morning of cooking, and mix your sauce blend up to a week in advance.
Insider Tips for Professional Results
Transform your homemade fried rice from acceptable to exceptional with these professional techniques that Chinese restaurant cooks use but rarely share.
Common Mistakes to Avoid
The Fresh Rice Disaster: Using just-cooked rice is the number one mistake that ruins fried rice recipes. No amount of technique can overcome moisture-logged rice. If you’re in a pinch, spread freshly cooked rice on a baking sheet and blast it under a fan for 30 minutes, but overnight refrigeration is infinitely better.
Temperature Timidity: Cooking over medium or medium-high heat won’t cut it. Your pan should be hot enough that a drop of water evaporates within one second. Yes, it’s scary. Yes, you’ll set off the smoke detector occasionally. But that intense heat is non-negotiable for authentic Chinese fried rice flavor.
Overcrowding Crisis: Trying to cook 8 cups of rice in a 10-inch skillet defeats the purpose. The temperature drops, ingredients steam instead of fry, and you end up with, well, steamed rice. Cook in batches if needed, or use the biggest pan you own.
Sauce Drowning: Adding too much soy sauce or liquid seasonings creates soggy rice that looks dark and unappetizing. The rice should be golden with subtle color variations, not uniformly brown. Add sauces gradually around the edges of the pan, never directly onto the rice.
Stirring Obsession: Constant stirring prevents the rice from developing those coveted crispy bits. Let it sit undisturbed for 20-30 seconds between tosses so the grains touching the pan can caramelize slightly.
Advanced Techniques
The Restaurant Secret: Professional Chinese kitchens often add a tiny splash of rice vinegar or a pinch of MSG right before finishing. It creates an aromatic burst that adds complexity and enhances the umami depth of the dish. Add just 1-2 teaspoons at the very end for maximum impact.
The Rice Press Method: Instead of constant tossing, try pressing the rice firmly against the hot pan surface with your spatula for 20 seconds, then toss, then press again. This maximizes contact with the heat and creates more of those golden, crispy bits everyone fights over.
Finishing Touch: Add your sesame oil at the very end and toss just once or twice. The residual heat releases its aromatic compounds without cooking it, which would destroy the delicate nutty flavor.
Creative Variations on This Recipe

Popular Fusion Ideas
Thai-Inspired Pineapple Version: Add 1 cup fresh pineapple chunks, 1/2 cup cashews, and 1 teaspoon curry powder. Finish with fish sauce instead of some soy sauce and top with fresh cilantro and lime wedges.
Korean Kimchi Rice: Replace 1 cup vegetables with chopped kimchi, add 1 tablespoon gochugaru (Korean chili flakes), and finish with a drizzle of kimchi juice. Top with a fried egg and nori strips.
Japanese Hibachi Style: Use short-grain Japanese rice, add 1 tablespoon butter at the end, and season with teriyaki sauce. Top with yum yum sauce and sesame seeds for that steakhouse experience.
Cauliflower Low-Carb Version: Replace rice entirely with riced cauliflower for a low-carb option. Cook time reduces to about 5 minutes, and you’ll need less oil since cauliflower doesn’t require the same texture development.
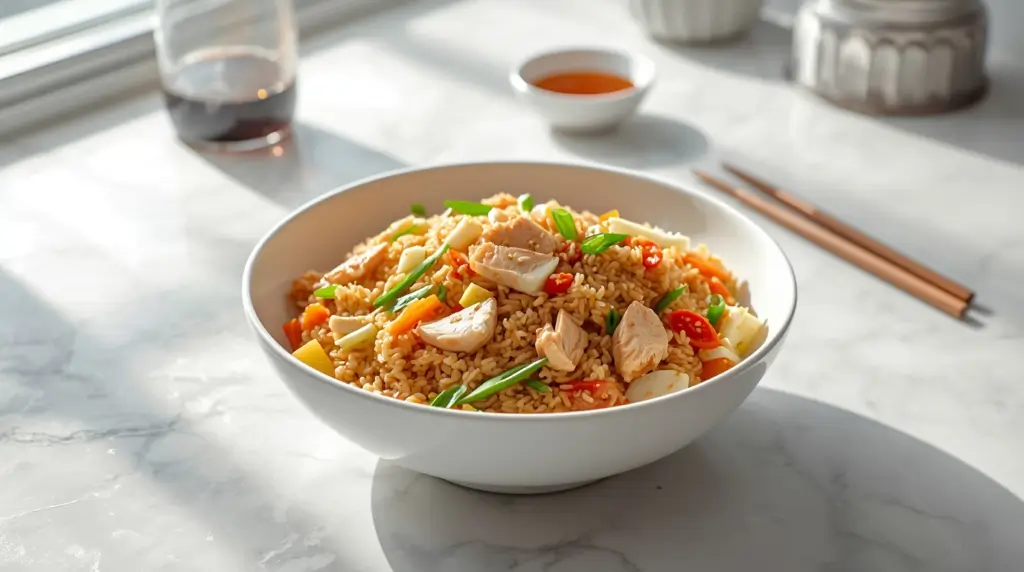
Stunning Presentation & Perfect Pairings
Restaurant-Style Plating Techniques
Transform your homemade fried rice into an Instagram-worthy dish: pack warm rice firmly into a small bowl, then invert onto the center of a plate and arrange vegetables around the base. For family-style drama, serve in a warmed shallow ceramic bowl with a sunny-side-up egg on top – break it at the table and mix through as guests watch.
Complementary Side Dishes & Beverages
Traditional Chinese Accompaniments:
- Hot and sour soup with silky tofu
- Scallion pancakes with ginger dipping sauce
- Chinese cucumber salad with chili oil
- Pan-fried dumplings
Perfect Beverage Pairings:
- Iced jasmine tea (unsweetened or lightly sweetened)
- Cold Tsingtao or other light Chinese beer
- Sparkling water with fresh lime and mint
- For special occasions: off-dry Riesling or Gewürztraminer
Storage Tips and Leftover Magic
One of the best things about this fried rice recipe is how well it keeps and transforms into new meals throughout the week.
Proper Storage Methods
Short-Term Storage (3-4 Days): Transfer cooled fried rice to airtight containers and refrigerate within 2 hours of cooking. The flavors actually deepen overnight as the seasonings continue to penetrate the rice.
Freezer Storage (Up to 3 Months): Portion into individual servings in freezer-safe containers or zip-lock bags pressed flat for easy stacking.
Reheating for Best Results: Heat 1 tablespoon oil in a skillet over medium-high heat, add rice, and stir-fry for 3-4 minutes until heated through and slightly crispy. For microwave, sprinkle 1-2 tablespoons water over rice, cover with a damp paper towel, and heat in 1-minute intervals.
Leftover Transformation Ideas
Fried Rice Breakfast Burrito: Warm a large flour tortilla, fill with fried rice, add a fried egg, cheese, and sriracha, then wrap and grill until crispy.
Crispy Rice Cakes: Form cold fried rice into patties, coat lightly with cornstarch, and pan-fry until golden. Serve with soy dipping sauce.
Stuffed Bell Peppers: Fill hollowed bell peppers with fried rice mixed with extra protein, top with cheese, and bake at 375°F for 25 minutes.
FAQ: Your Recipe Questions Answered
Can I make this fried rice recipe with brown rice instead of white rice? Absolutely! Brown rice actually works great because it’s already firmer than white rice. Cook it fully, refrigerate overnight just like white rice, and proceed with the recipe. The result will be nuttier and slightly chewier, with added fiber and nutrients.
What’s the best way to break up clumpy refrigerated rice before cooking? Use your hands – seriously. Dump the cold rice onto a cutting board and use your fingers to gently separate the clumps. This takes about 2 minutes and makes a huge difference in the final texture.
Why does my homemade fried rice always turn out mushy? Three main culprits: using freshly cooked rice (not day-old), cooking over too-low heat, or adding too much sauce. Make sure your rice is properly dried and cold, your pan is screaming hot, and you’re going light on the liquid seasonings.
Can I use sesame oil for cooking the fried rice? No! Sesame oil has a low smoke point and will burn, creating bitter flavors. Always use a neutral high-heat oil (vegetable, canola, or peanut) for cooking, and add sesame oil only at the very end as a finishing touch.
How do I get that smoky restaurant flavor when making Chinese fried rice? That flavor is called “wok hei” (breath of the wok), and it comes from cooking over extremely high heat. Get your pan as hot as possible, work quickly, and don’t be afraid of a little smoke. A carbon steel wok on a gas stove gives the best results, but a large skillet cranked to maximum heat works too.
Is MSG really necessary for authentic Chinese fried rice? It’s not necessary, but it does add that umami depth that makes restaurant versions taste so craveable. MSG is a naturally occurring compound (also found in parmesan cheese and tomatoes) that enhances savory flavors. If you prefer to skip it, consider adding a bit of mushroom powder instead.
What type of soy sauce should I use for the best flavor? Light soy sauce (also called thin soy sauce) is ideal for fried rice because it adds flavor and salt without darkening the rice too much. Avoid thick or dark soy sauce, which will make your rice look muddy. Japanese soy sauce also works excellently.
Can I make this fried rice recipe ahead for meal prep? Definitely! Fried rice is perfect for meal prep because the flavors improve over time. Make a large batch on Sunday, portion it into containers with your choice of toppings kept separate, and you have quick lunches or dinners for the week. Just reheat in a skillet to restore some crispiness.
Ready to create restaurant-quality Chinese fried rice that will make you forget about takeout? Gather your leftover rice and transform it into something extraordinary!
Leave a Review
There are no reviews yet. Be the first one to write one.
Leave a Review
There are no reviews yet. Be the first one to write one.